HTML and CSS form the foundation of the web, as they are what the browser processes—HTML structures the content, CSS adds style, and PHP powers dynamic functionality behind the scenes.
If you’re working in anything web-related, having a website is a must! It’s your online presence, and without one, you could be missing out on great opportunities.
For this demo, hopefully, you already have a Linux development environment set up on your Chromebook. In this example, the dev environment is named “container.” You’ll also need VS Code installed in your Chromebook’s Linux development environment. Don’t worry—installing VS Code is simple! You can follow the step-by-step guide in this blog post.
For this demo, we’ll be using Azure’s Free F1 instance of a web app. Azure is designed with small businesses in mind and offers an intuitive experience. To access the free tier instance, a pay-as-you-go subscription is required—but don’t worry, you won’t be charged unless you choose to scale up the instance.
In this demo, we’ll set up a workflow by installing the Azure extension, resolving the OS keyring issue for VS Code, and installing a graphical SFTP client. After that, we’ll connect to the Azure web app instance via SFTP, create index.php, and upload it to the Azure instance.
You’ll discover how developing a website or web app on a Chromebook Plus is not only practical but also reduces frustration and minimizes computing maintenance.
index.php via SFTP to the Remote Azure Web App Instance
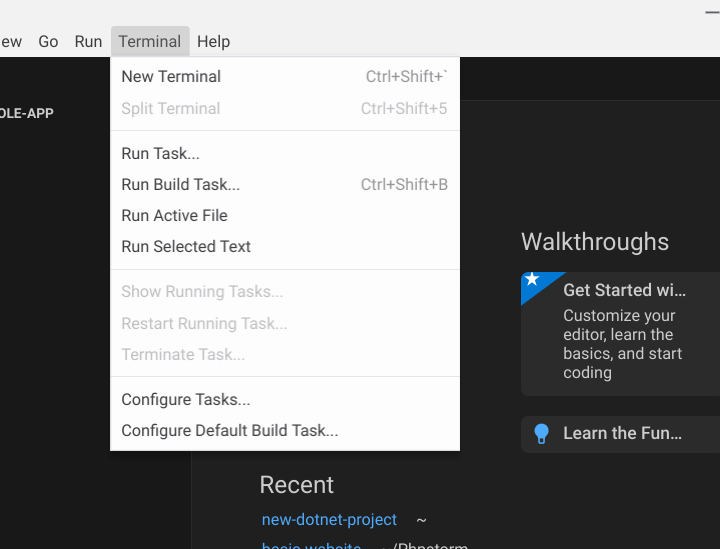
Installing the Azure Resources Extension in VS Code
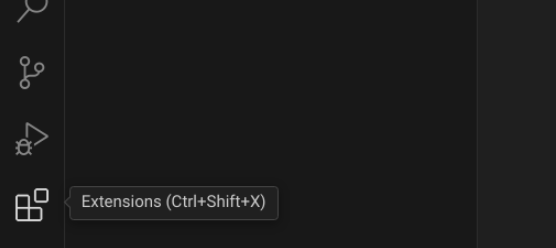
Let’s open Visual Studio Code and head over to the Extensions tab.
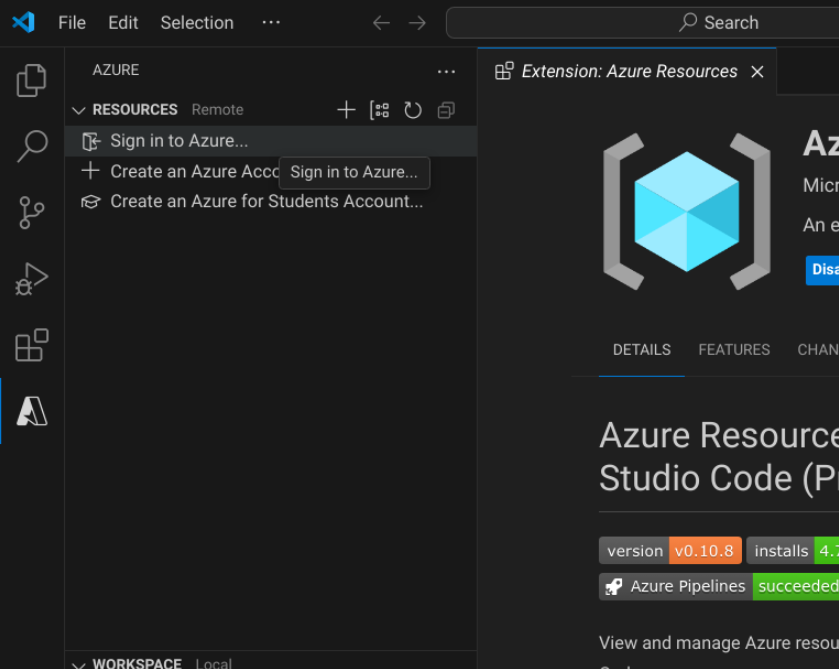
Now, let’s install the Azure Resources extension in VS Code. Simply type “Azure Resources” in the search field.

Next, click the “A” icon under the Extensions tab, then select Sign in to Azure.
Fixing the OS Keyring Issue in VS Code on a Chromebook
When signing into Azure from the Azure Resources extension, VS Code may be unable to resolve the OS keyring.
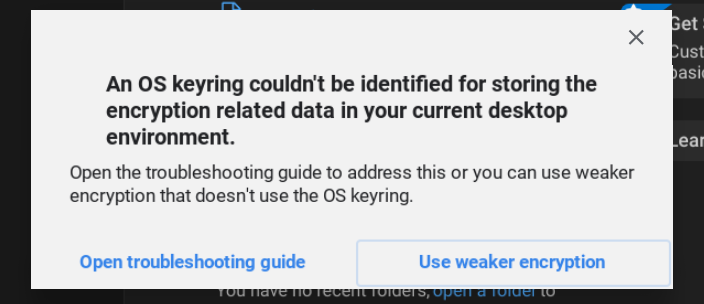
Avoid using weaker encryption. Simply click the X at the top right of the modal window, then close VS Code.
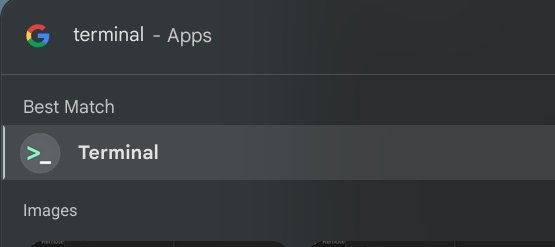
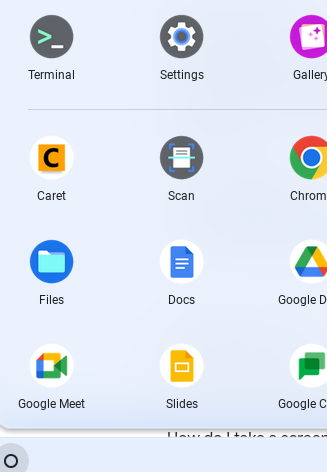
Now, open the Terminal by clicking the launcher button in the bottom left corner.
According to the troubleshooting guide, we need to install kwallet5. Open the Terminal and search for kwallet5. Then, copy and two-finger tap to paste the following command into the Terminal.
sudo apt search kwallet5
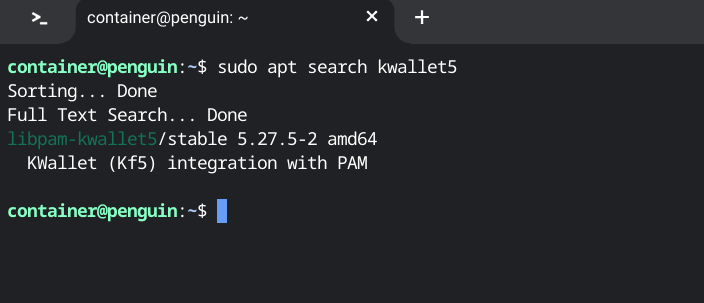
The Terminal indicates that the package to install is libpam-kwallet5.
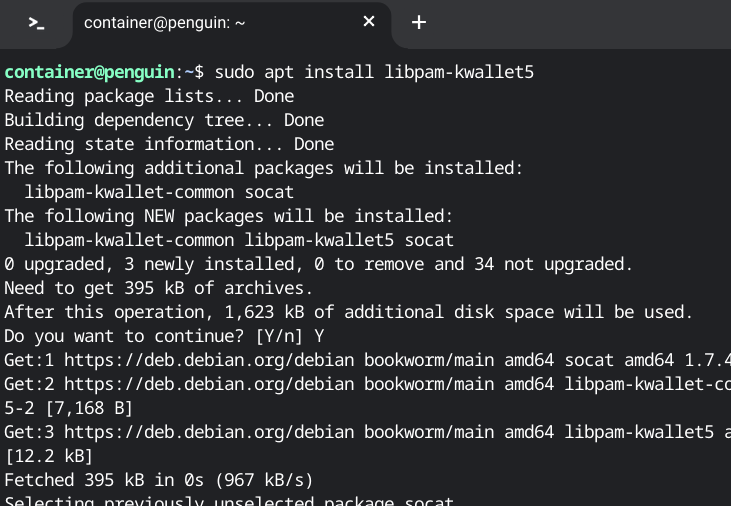
Now, let’s install libpam-kwallet5. Copy the command below, two-finger tap to paste it into the Terminal, and press Enter.
sudo apt install libpam-kwallet5
To clear the Terminal window, simply type clear and press Enter.
clear
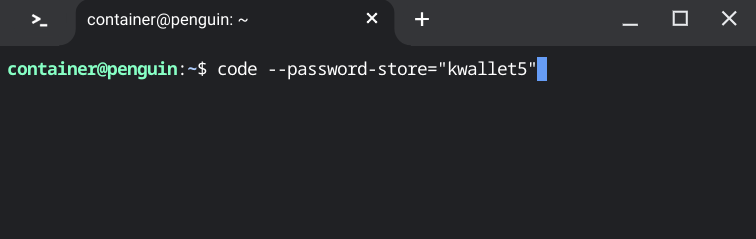
Now, let’s launch VS Code from the Terminal and set kwallet5 as the password store.
According to the troubleshooting guide, even if you install the kwallet6 package, you can still use kwallet5 as the setting for the password-store parameter.
Copy and paste the following command into the Terminal to open VS Code with kwallet5 for password storage.
Keep in mind that whenever you want to connect to Azure’s App Service, you’ll need to launch VS Code using the following Terminal command.
code --password-store="kwallet5"
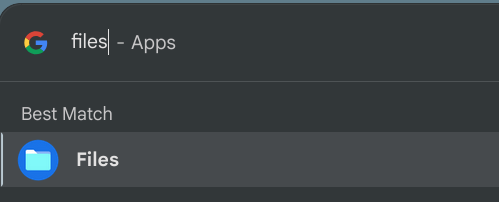
Keep the VS Code window open, and then open the Files app to create a project folder inside the Linux container.
Creating a Project Folder Using the Files App on Chromebook Plus
Open the Files app by launching the Launcher and typing Files in the search bar. You can also copy and two-finger tap to paste “files”.
The folder we’re creating will be used for the initial test handshake with a graphical FTP client called FileZilla.
files
In the Files window, click Linux files, then click the three-dot menu button and select New folder.
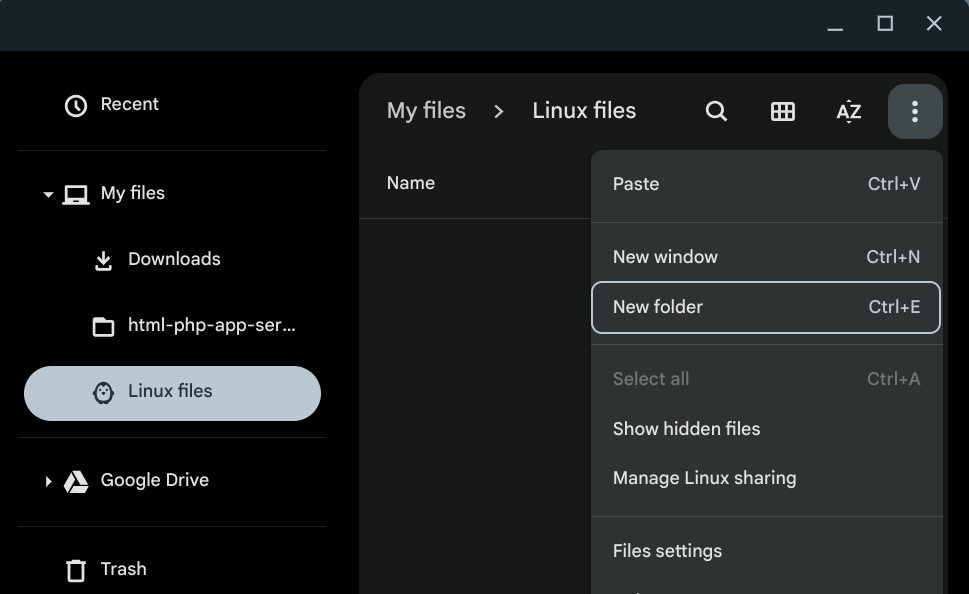
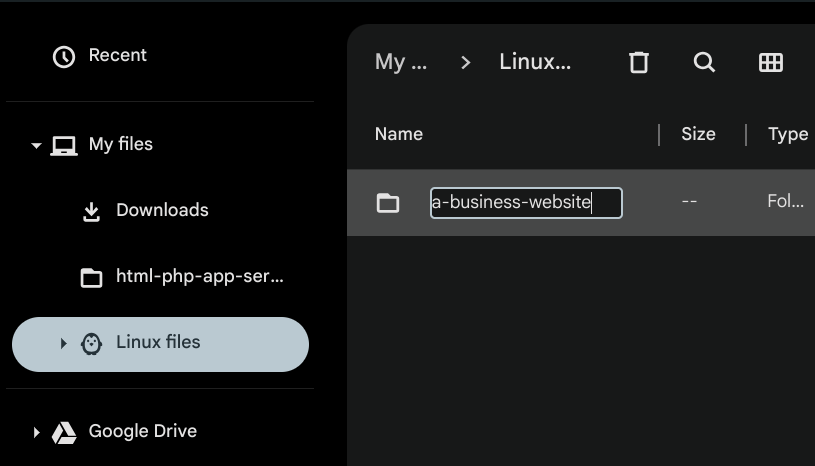
Rename the folder to “a-business-website”.
a-business-website
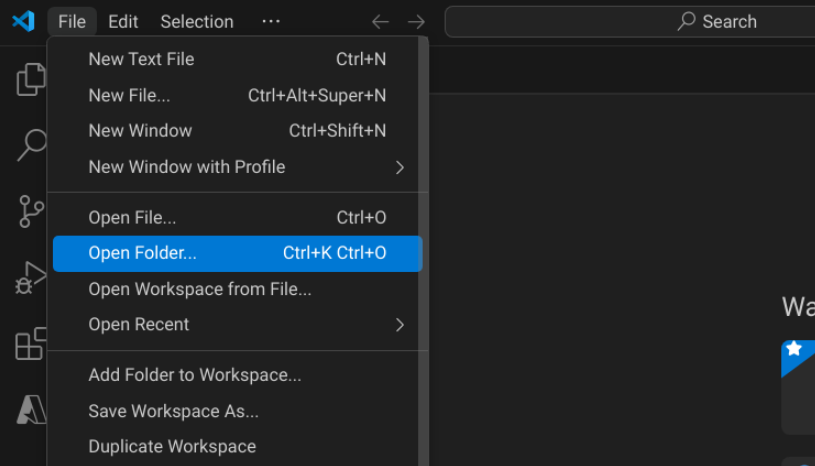
Open the folder in VS Code by clicking File in the top menu, then selecting Open Folder….
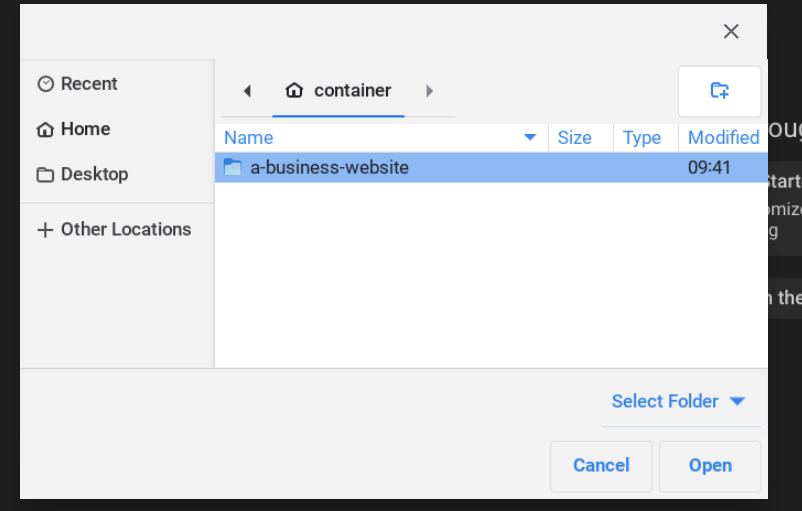
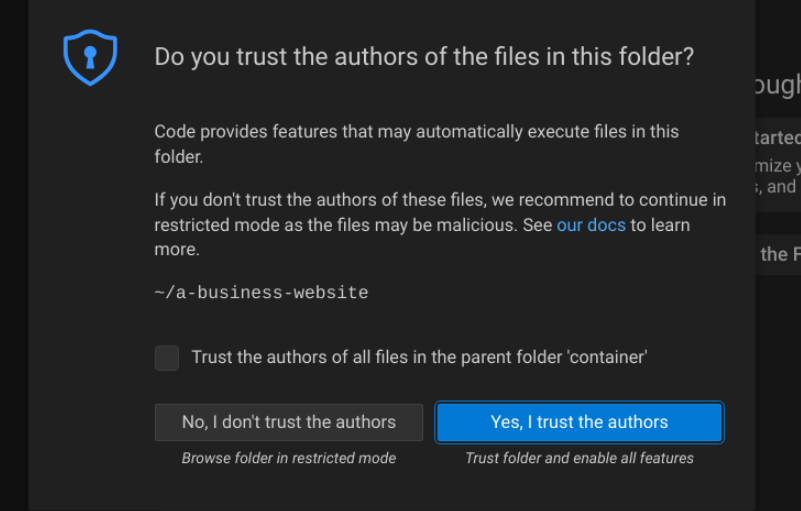
In the pop-up window, select “a-business-website”.
Click “Yes, I trust the authors” to proceed.
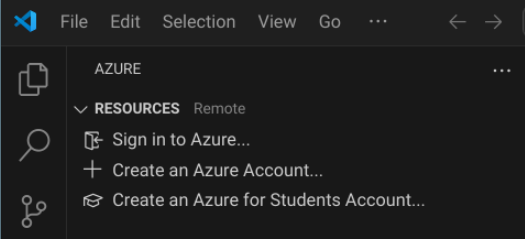
Now, let’s connect VS Code to the App Service.
In this scenario, we’ll perform a test connection. An Azure account with a subscription already set up, and we’ll try using the free tier for testing.
Once the Azure extension is selected, you’ll see three options available.
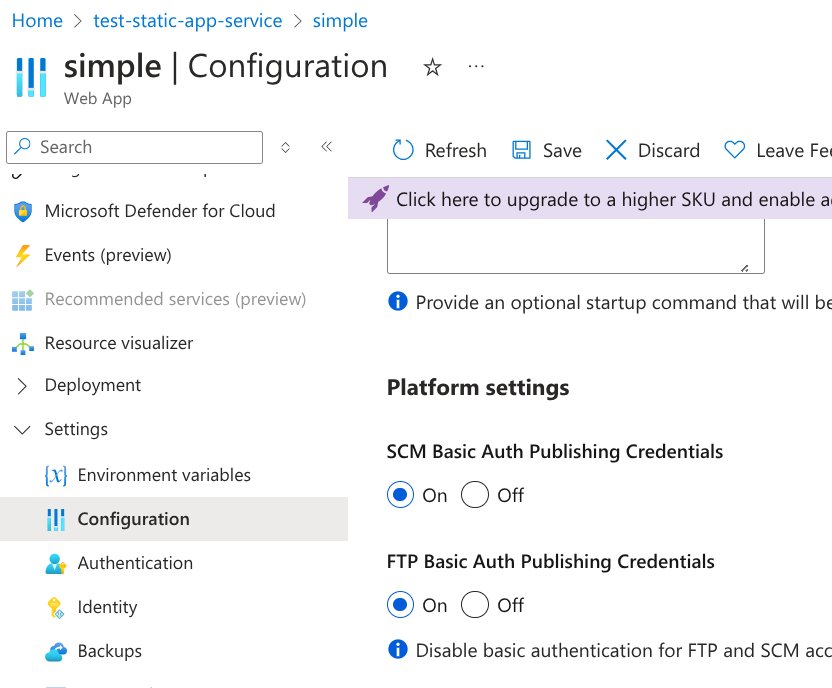
Creating a Web App container in Azure
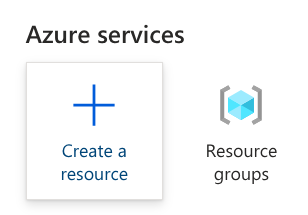
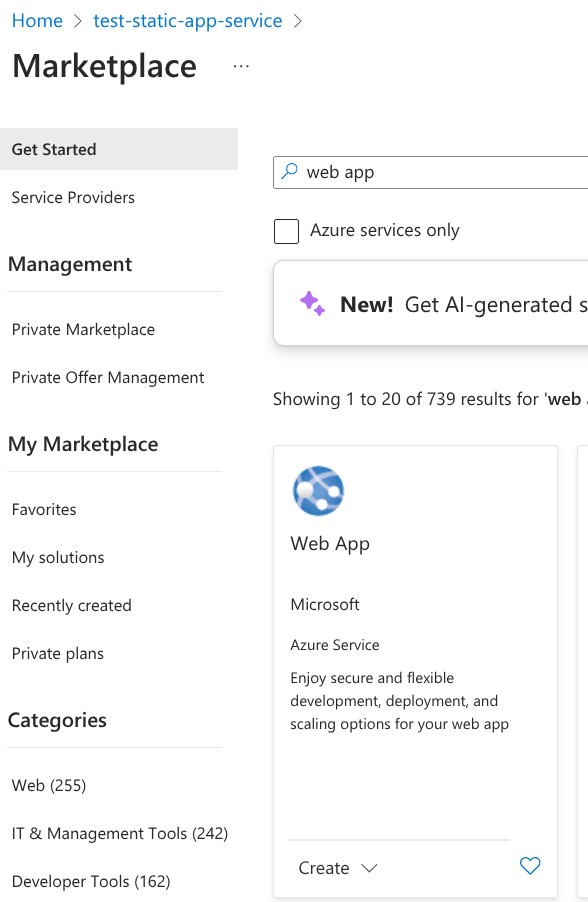
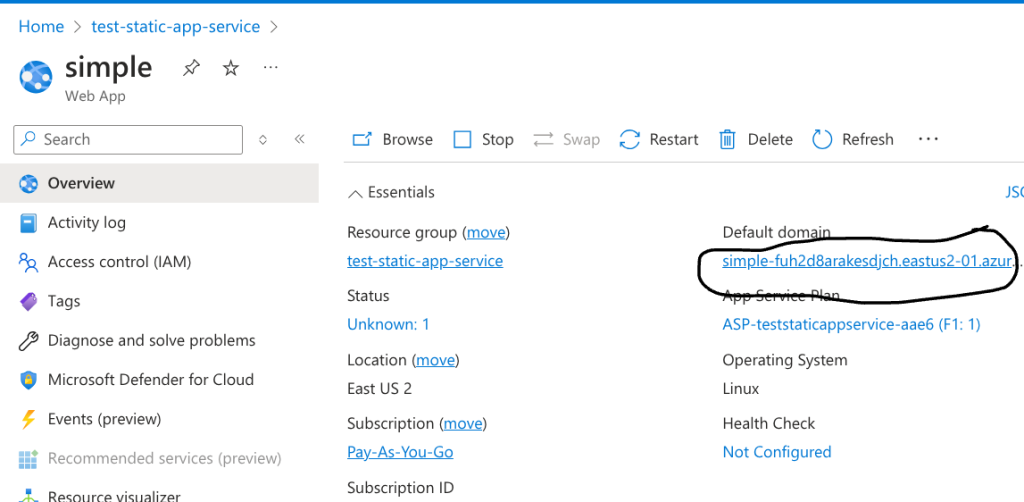
In the Azure portal, let’s create a resource. Organizing resources inside resource groups makes management easier and helps keep track of costs more effectively.
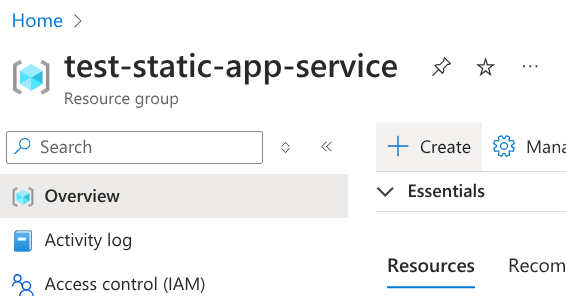
For this example, I’ve created a resource group named “test-static-app-service”.
Next, inside the resource group, click Create.
In the Marketplace, search for “Web App” and click Create.
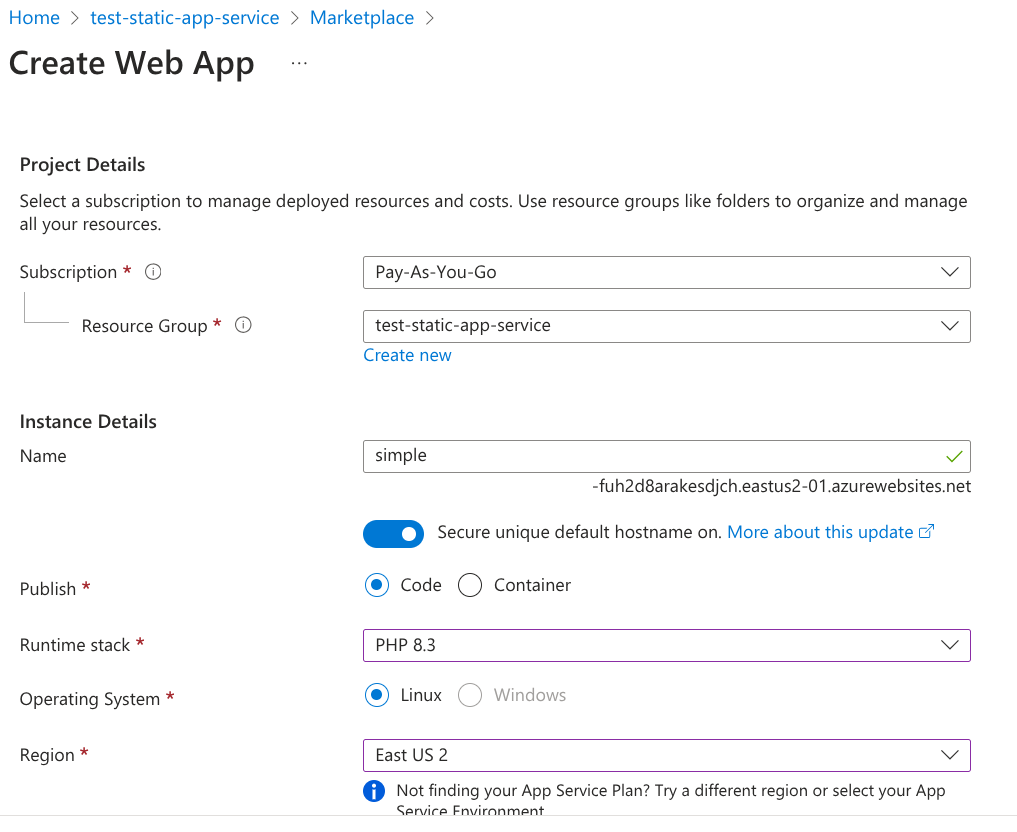
Set the name to “simple”, choose Code for publishing, select PHP 8.3 as the runtime stack, and pick a nearby region from the dropdown menu.
Scroll down and select the F1 Free Tier plan.
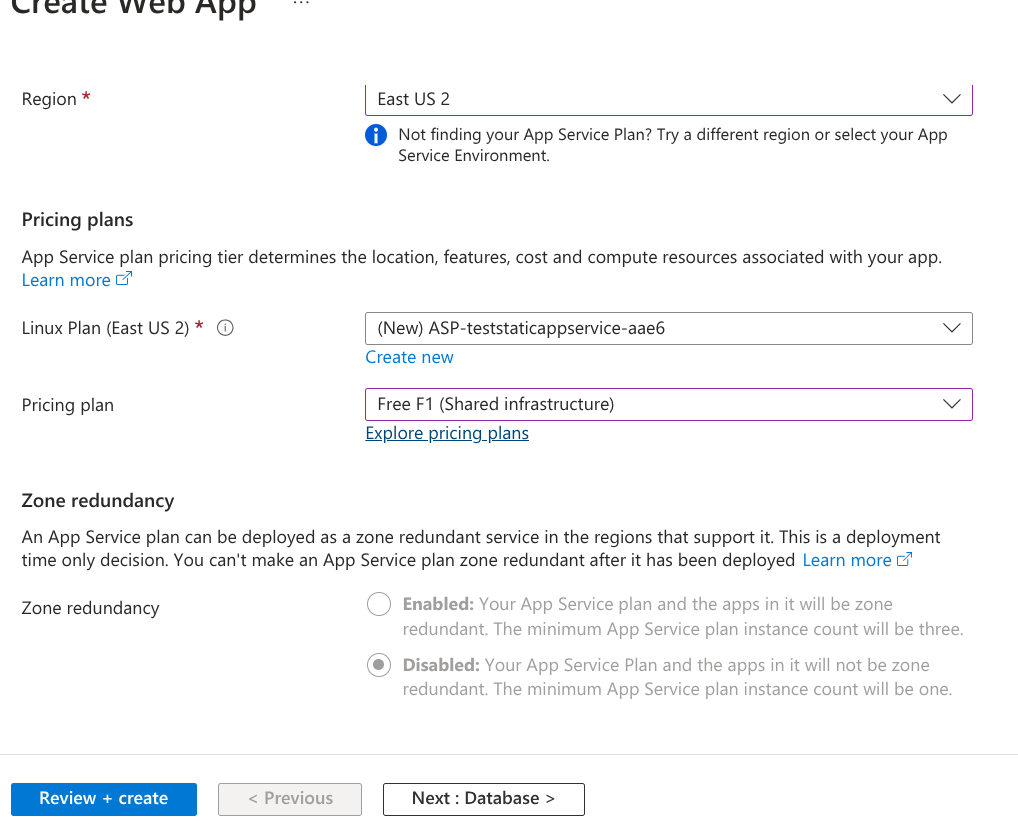
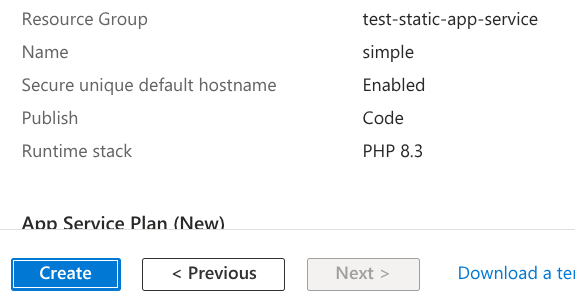
At the bottom of the portal page, click Review and Create, then click Create. This will start provisioning the “simple” instance.
At the bottom of the portal page, click Review and Create, then click Create. This will start provisioning the “simple” instance.
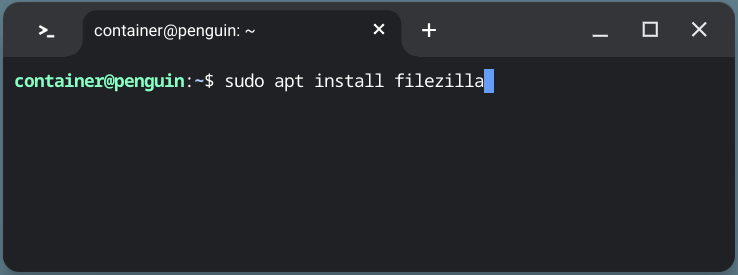
Installing FileZilla: A Graphical FTP Client on Chromebook Plus
While you can use Git, it can be a bit overwhelming when working on an initial small business website.
Let’s install FileZilla FTP using the Chromebook Plus Terminal.
Open the Terminal on your Chromebook Plus and enter the following command.
sudo apt install filezilla
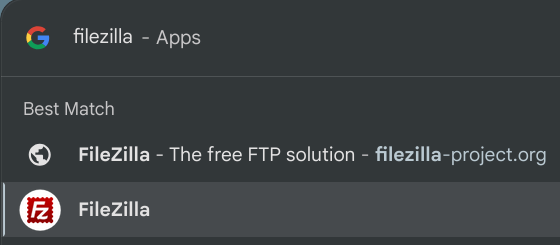
Open FileZilla by searching for the app in the Launcher.
filezilla
Take a moment to notice that the folder created earlier, “a-business-website”, is visible. You’ll need to click on this folder when uploading files from it.
Copying and Pasting SFTP Credentials into FileZilla
Visit the Azure portal to copy your FTP credentials.
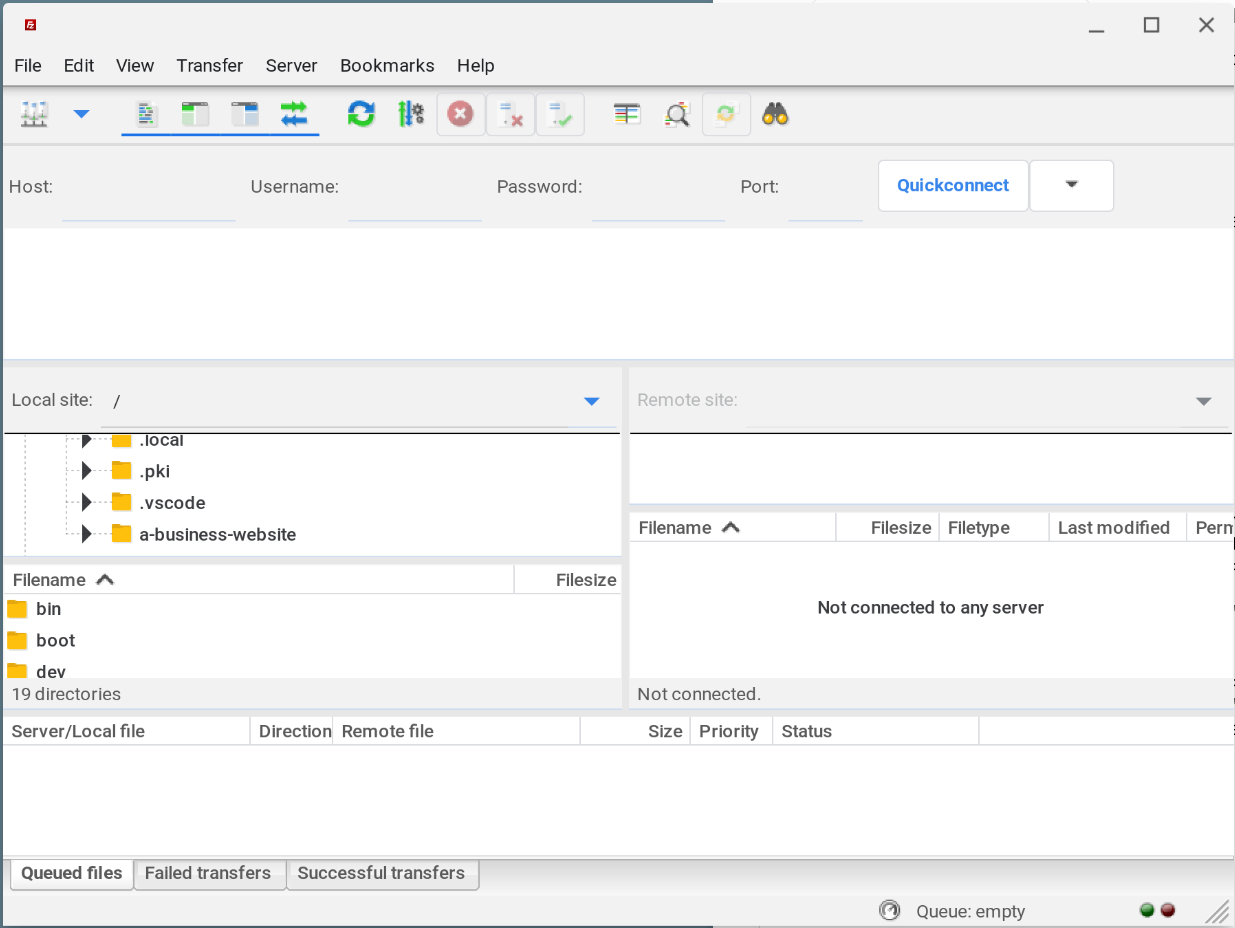
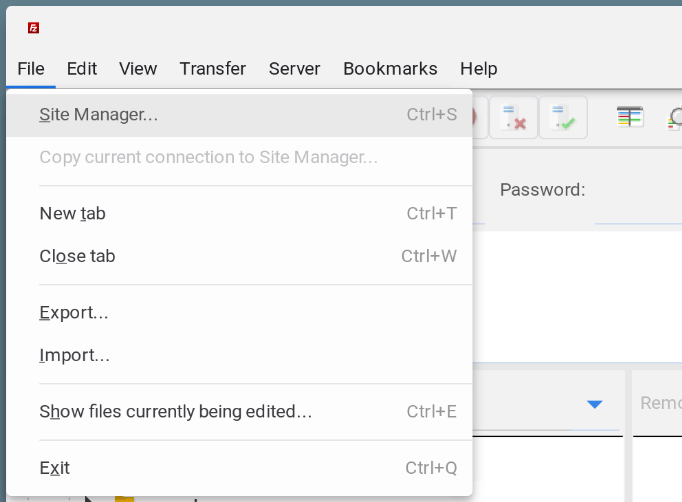
Open the Site Manager in FileZilla by clicking File, then selecting Site Manager.
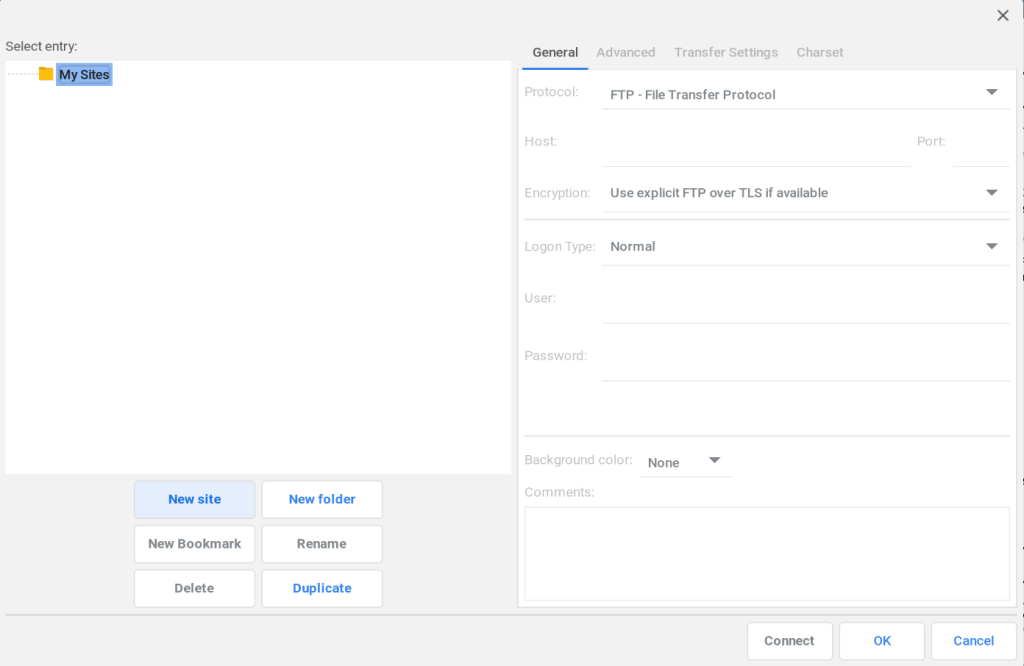
In the Site Manager, click New Site.
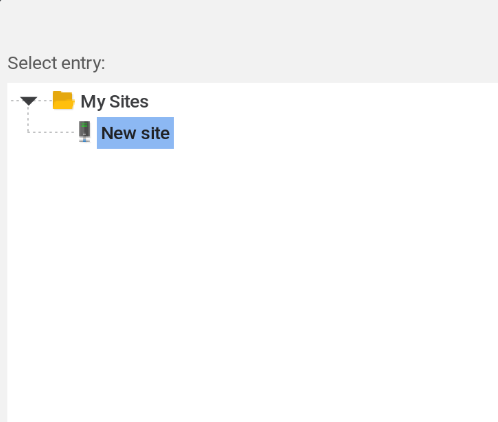
Simply press Enter to proceed, keeping the site name as “New site”, due to an interface anomaly.
To copy the SFTP credentials, visit the Deployment Center inside the “simple” resource.
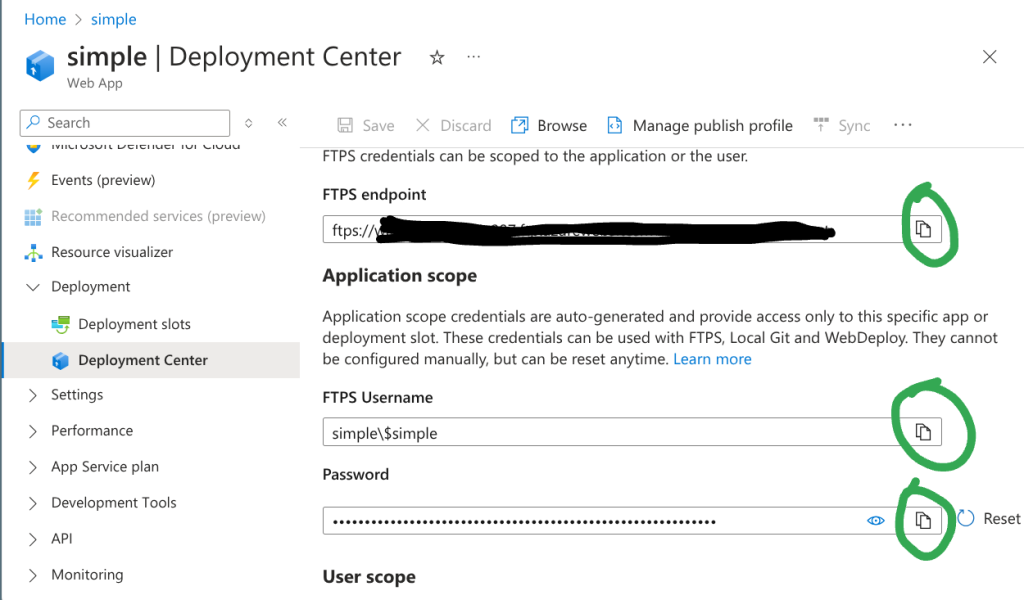
Paste the SFTP credentials by using a two-finger tap on the Chromebook touchpad.
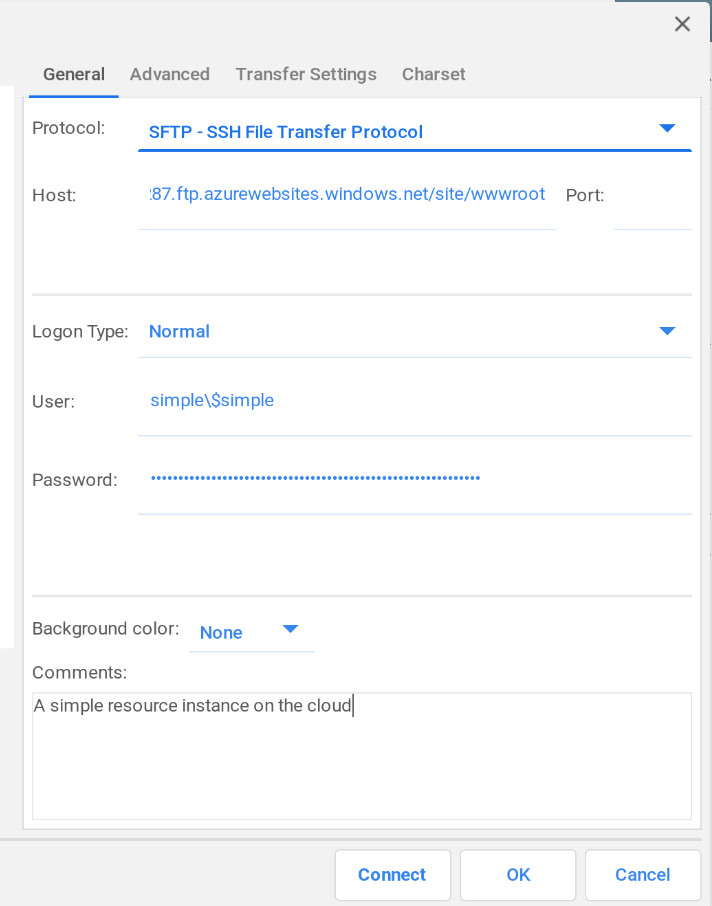
After saving the password and clicking Connect, click OK to trust the SFTP server certificate.

Congratulations! You now have a successful SFTP connection to a remote SFTP server in an Azure cloud web app instance.
Uploading index.php via SFTP to the Remote Azure Web App Instance
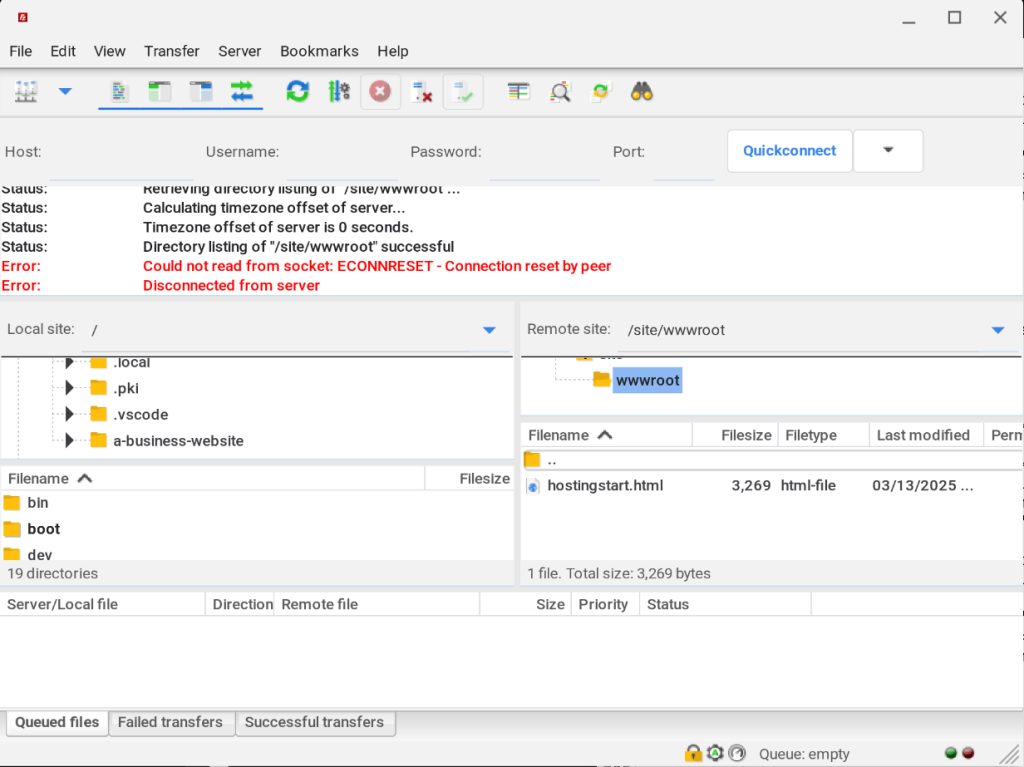
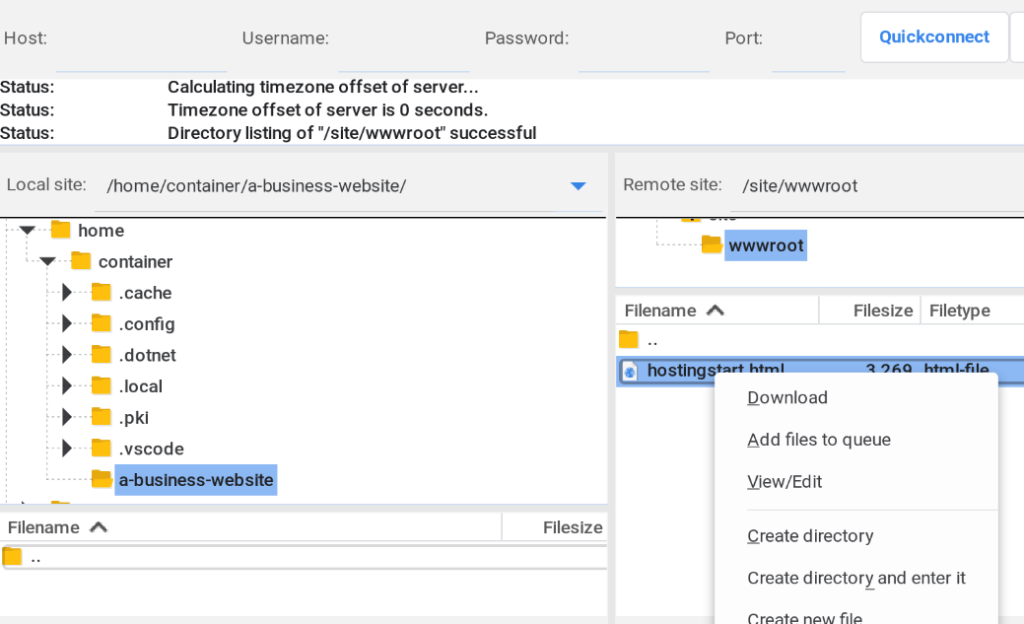
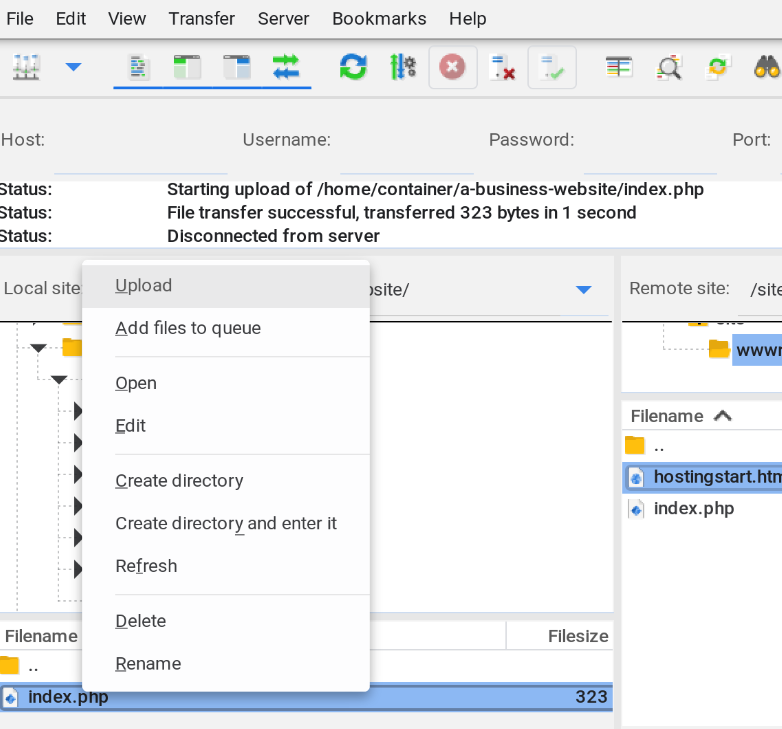
In FileZilla, navigate to the left panel, expand home and container, then click on the a-business-website folder. The two left window frames display local files.
Open the Site Manager by navigating to File → Site Manager, then click Connect. Next, two-finger tap on hostingstart.html and select Download.
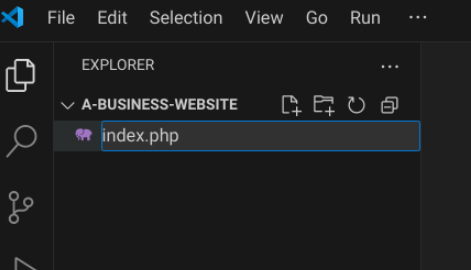
In VS Code, create a new file named index.php.
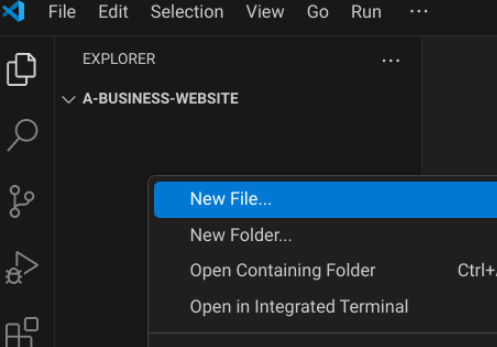
In VS Code, name the file index.php.
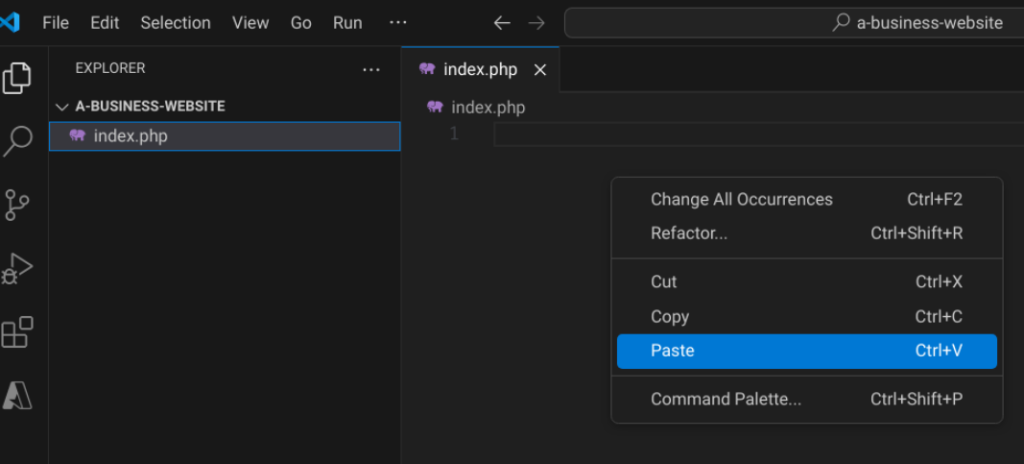
Copy the following HTML document markup and paste it into index.php in VS Code.
<!DOCTYPE html>
<html lang="en">
<head>
<meta charset="UTF-8">
<meta name="viewport" content="width=device-width, initial-scale=1.0">
<title>Testing sftp upload</title>
</head>
<body>
<h1>Testing static website</h1>
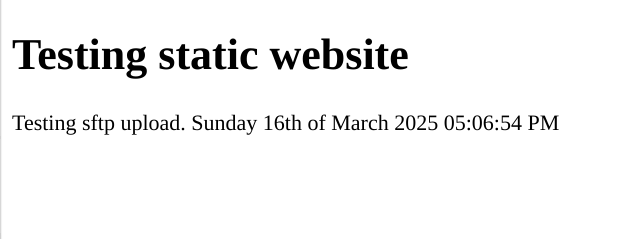
<p>Testing sftp upload. Todays Date is <?php echo date('l jS \of F Y h:i:s A'); ?></p>
</body>
</html>
In VS Code, click on index.php in the left pane, then paste the HTML document markup.
In the FileZilla FTP client, upload the index.php file created in VS Code.
To view the changes, go to the Azure portal, open the Web App resource, and click the link under Default Domain.
When you visit the Default Domain link, you should see the following page.
Now you have a complete workflow for building and managing your static business website using your Chromebook! Remember, your initial website doesn’t need to be fancy—it can simply be a plain HTML document. As you identify your business needs, you can gradually improve it. The most important thing is that your content and data belong to you, giving you complete control over your website.
For further reading on building your PHP website, I recommend Chapter 8, as it explains how to structure a static PHP application by breaking sections apart using PHP file imports. A great resource for this is Larry Ullman’s 2011 publication, PHP for the Web: Visual QuickStart Guide.
For a higher-level managerial perspective on HTML and CSS, I recommend HTML and CSS: Design and Build Websites.
Chromebook is a valuble product at a low cost. In the past, before a user had access to a linux terminal required a hefty expense at a local computer store, and to download a linux distro was such a pain over DSL internet connection. Now you can install all the tools you need on Chromebook to start doing web development and much more.
Here’s how to set up a .NET development environment on a Chromebook after enabling the Linux development environment.
If you don’t already have a linux development environment container on your Chromebook. Visit this page to do so before going forward. Once it’s setup then you can open terminal window and continue with this blog post.
Open Terminal on Chromebook
If you have already enabled the Linux Development Environment on your Chromebook, open the terminal.
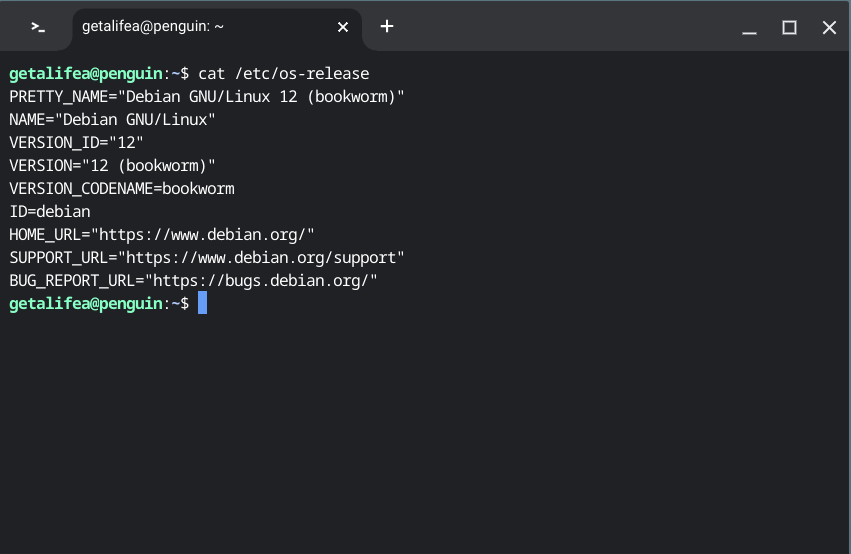
Finding out the Version of Debian on your Chromebook
You first have to check what version of debian your Chromebook’s linux development environment is running. There is a Google support page about checking version of Debian.”
Type the following in terminal.
cat /etc/os-release
Installing Repository for .NET Core based on debian version
Based on the Debian version on your Chromebook, we need to install the corresponding .NET repository..
Add the .NET repository for Debian 12 to install .NET. If your Debian version is different, you can find instructions here. For Debian 11, visit here, or for Debian 10, visit here.
Type the following for debian 12 in Chromebook Terminal.
sudo wget https://packages.microsoft.com/config/debian/12/packages-microsoft-prod.deb -O packages-microsoft-prod.deb
Once the repository file is downloaded, install it using your package manager.
sudo dpkg -i packages-microsoft-prod.deb
Copy paste the following to install .NET sdk.
sudo apt-get update && sudo apt-get install -y dotnet-sdk-8.0
Install aspnetcore runtime
Copy paste the following to install aspnetcore runtime.
sudo apt-get update && sudo apt-get install -y aspnetcore-runtime-8.0
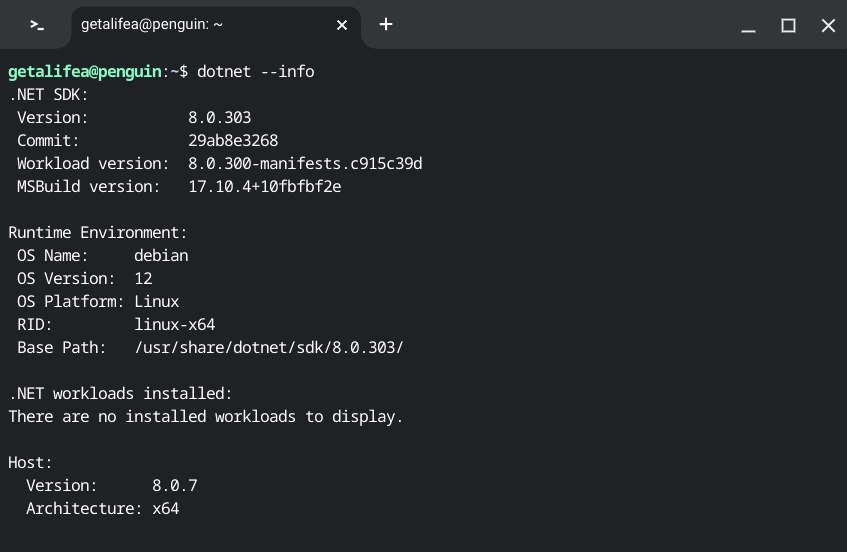
You might see the following welcome message in your Chromebook’s terminal.
    Welcome to .NET 8.0!
    ---------------------
    SDK Version: 8.0.303

    Telemetry
    ---------
    The .NET tools collect usage data in order to help us improve your experience. It is collected by Microsoft and shared with the community. You can opt-out of telemetry by setting the DOTNET_CLI_TELEMETRY_OPTOUT environment variable to '1' or 'true' using your favorite shell.

    Read more about .NET CLI Tools telemetry: https://aka.ms/dotnet-cli-telemetry
We can also verify if the dotnet command is working by using an info flag in the terminal.
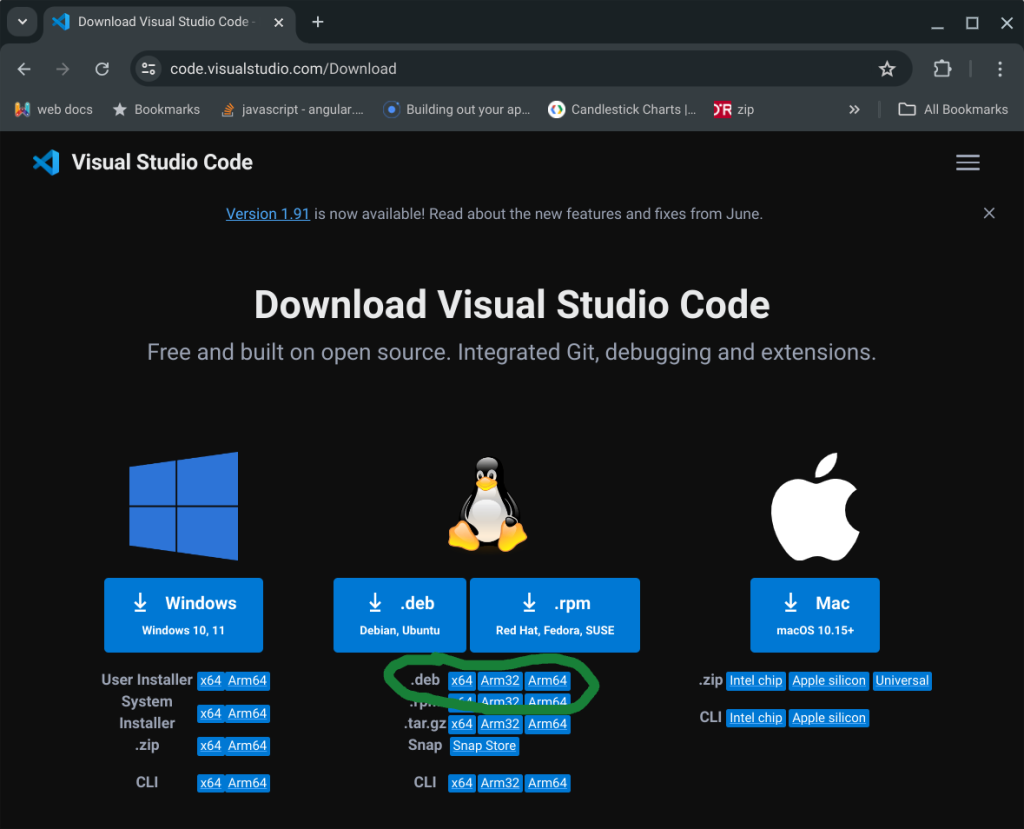
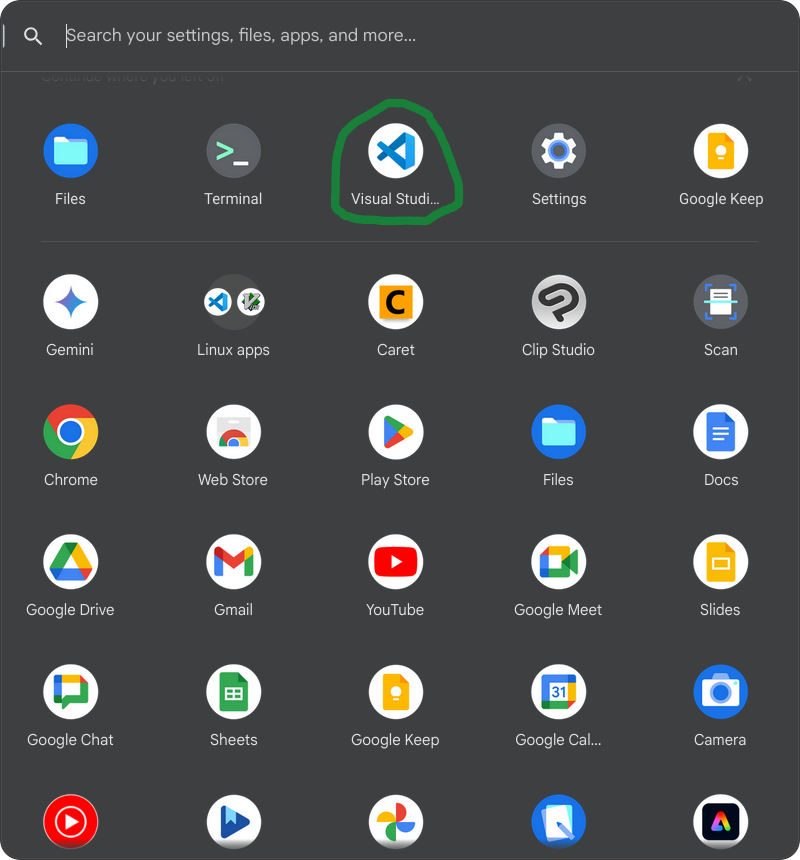
Install Visual Studio Code on Chromebook
Next we need to install vs code, a code editor to create and try out dotnet console app inside vs code’s terminal panel.
Next, we need to install Visual Studio Code, a code editor that allows you to create and test .NET console apps directly within its terminal panel.
uname -m

If your Chromebook has an ARM architecture, you will see arm32 or arm64. If it’s x64, the Linux terminal in your Chromebook will output x86_64. In this case, you should download the x64 .deb installer.
Visit code.visualstudio.com/download and click the appropriate .deb button to download the Visual Studio Code installer.
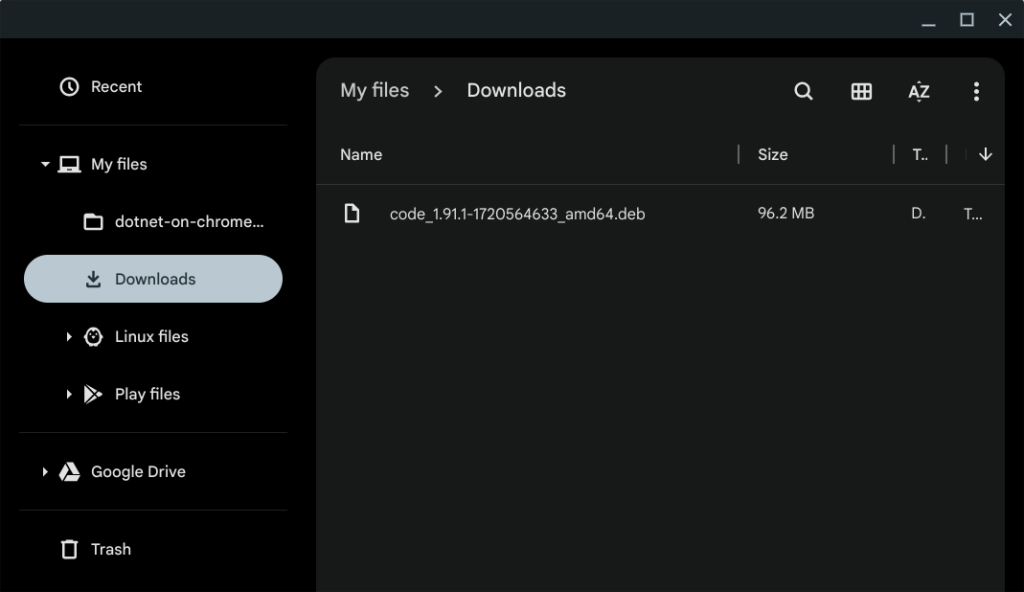
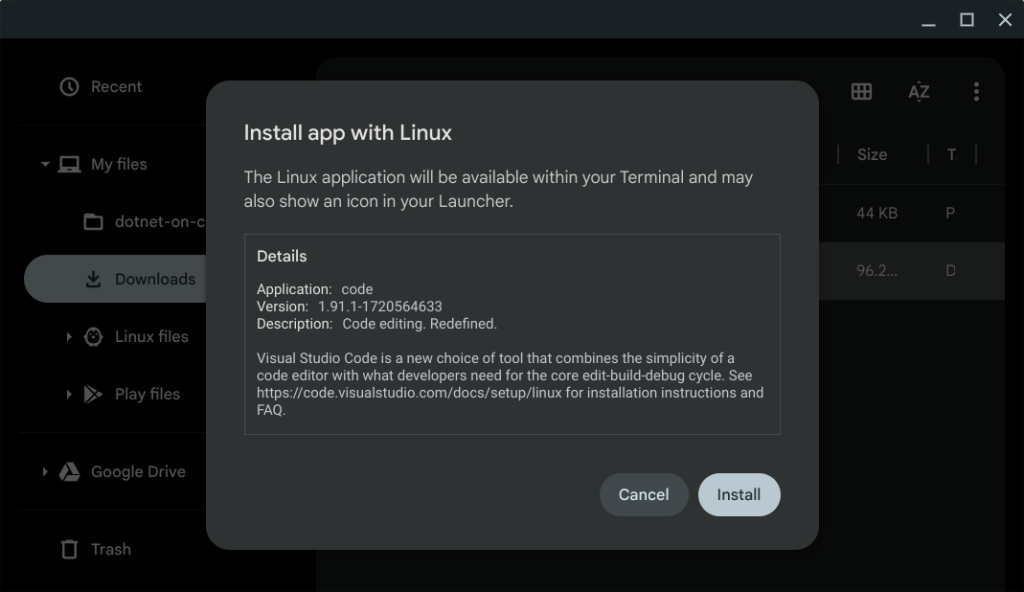
After downloading, install Visual Studio Code by navigating to the Downloads folder on your Chromebook and double-clicking the .deb installer.
After double-clicking the .deb installer, you should see the following screen:
Create a project folder for your first console app.
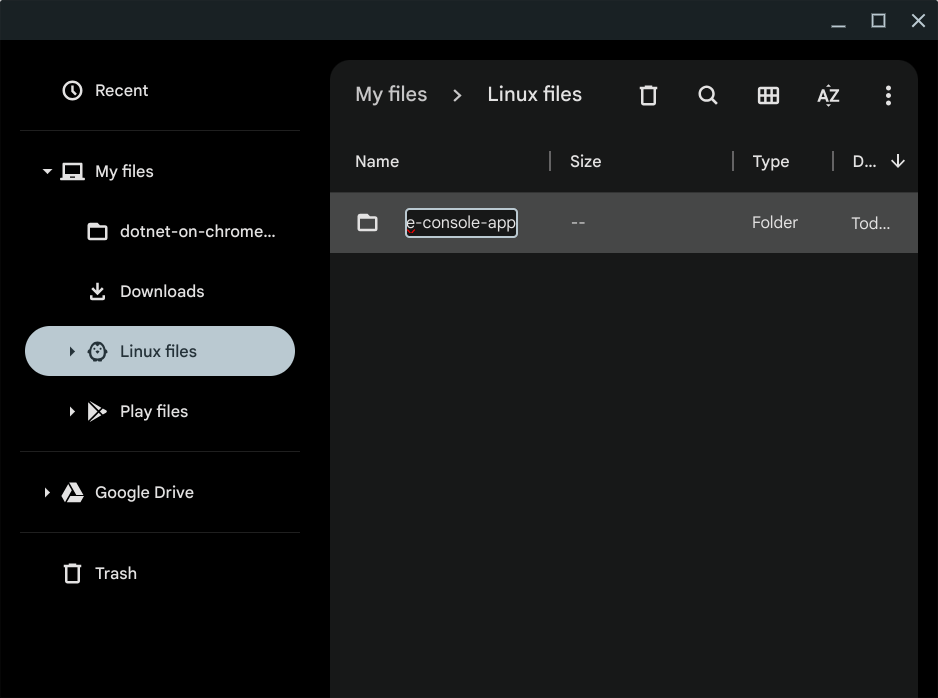
You need to create a folder accessible to the Chromebook development environment to try out .NET. When the Linux development environment is enabled on a Chromebook, there is a shared folder named “Linux files” from the Linux container.
Let’s create a new folder inside the Linux files directory, open it in Visual Studio Code (VS Code), and start a .NET console project.

Here is an image showing the creation of a folder named vs-code-console-app in the Linux files directory.
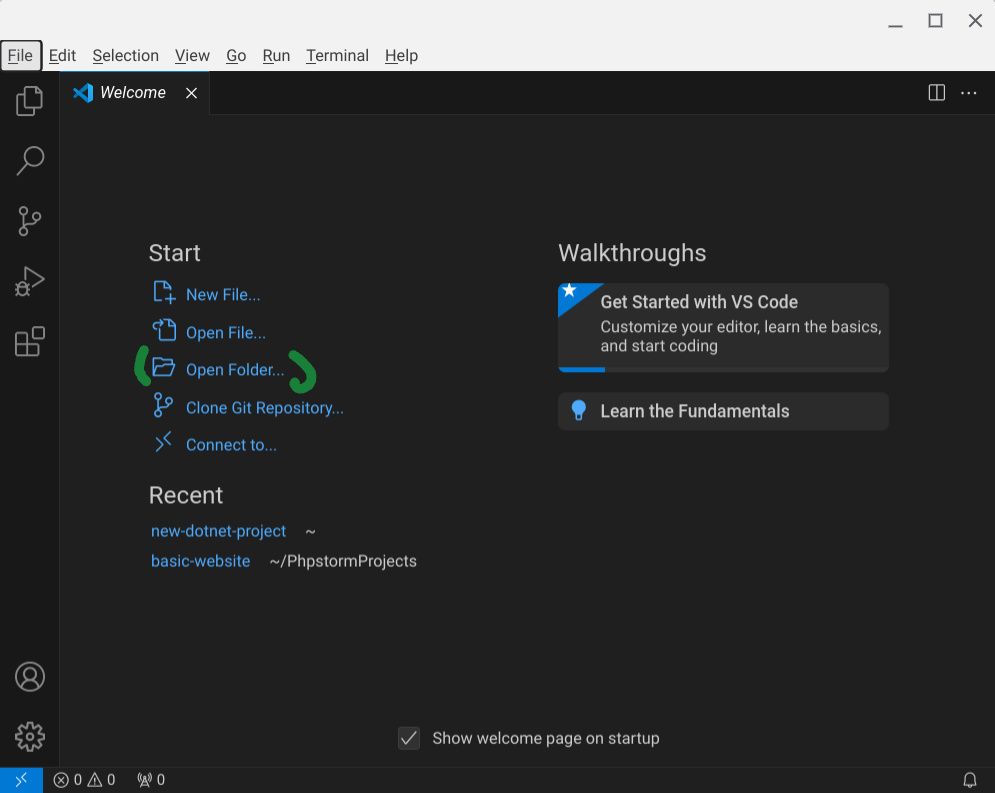
Start vscode and open project folder
When starting to program in C#, it’s best to begin with simple console apps before progressing to web development projects.
Let’s open Visual Studio Code (VS Code) and navigate to the folder we created in the Linux files directory.
Now, open the folder you created earlier in the Linux files directory within Visual Studio Code.
Select the folder named vs-code-console-app and click “Open.”
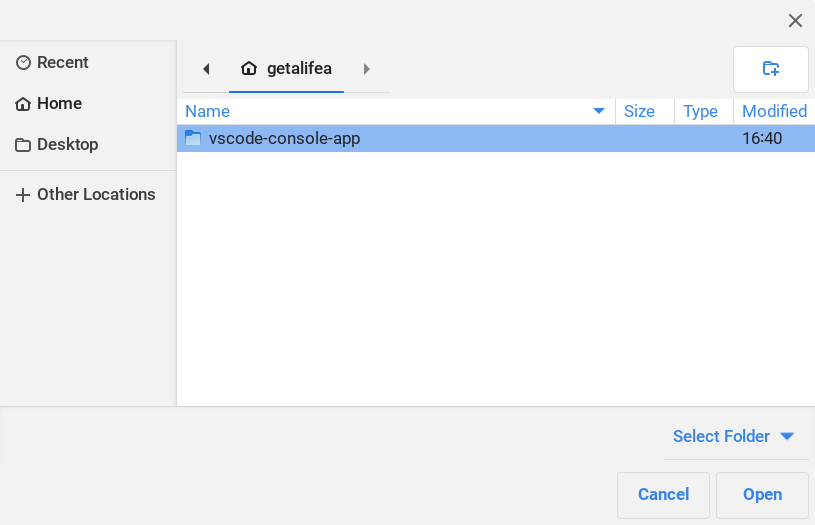
A popup alert will ask if you trust the authors. Since it’s an empty folder, click “Yes, I trust the authors.”

Creating a Console App in Visual Studio Code
Open the terminal panel in Visual Studio Code.
In the VS Code terminal, enter the following command to create files from the console app template.
dotnet new console
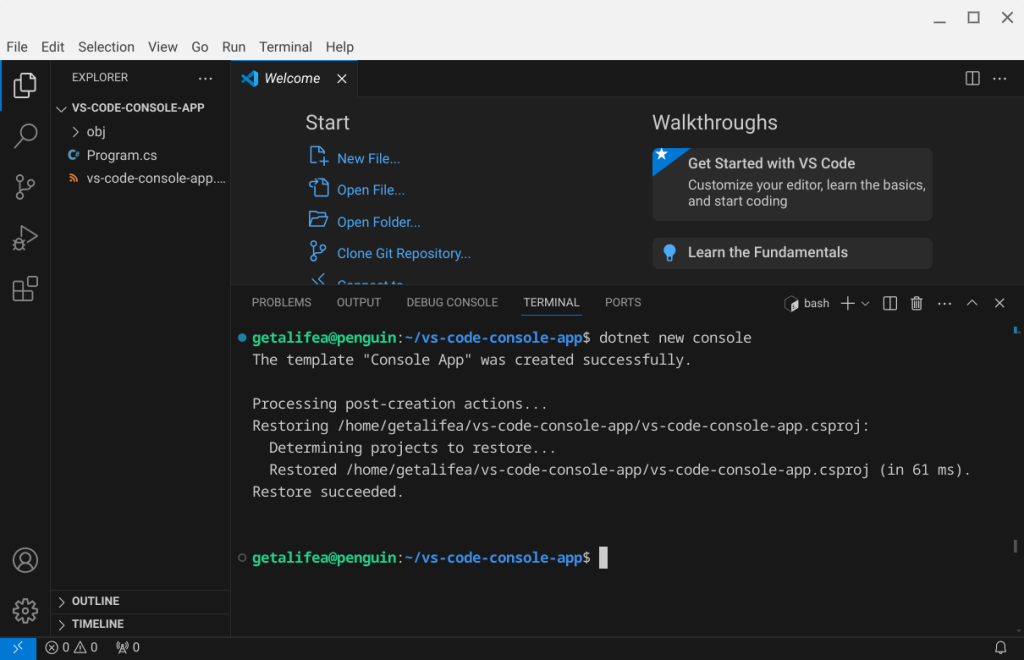
The “dotnet new console” terminal command creates a Program.cs file and vs-code-console-app.csproj file.
To create a more practical and meaningful console application than simply “Hello World,” you will need to edit Program.cs.
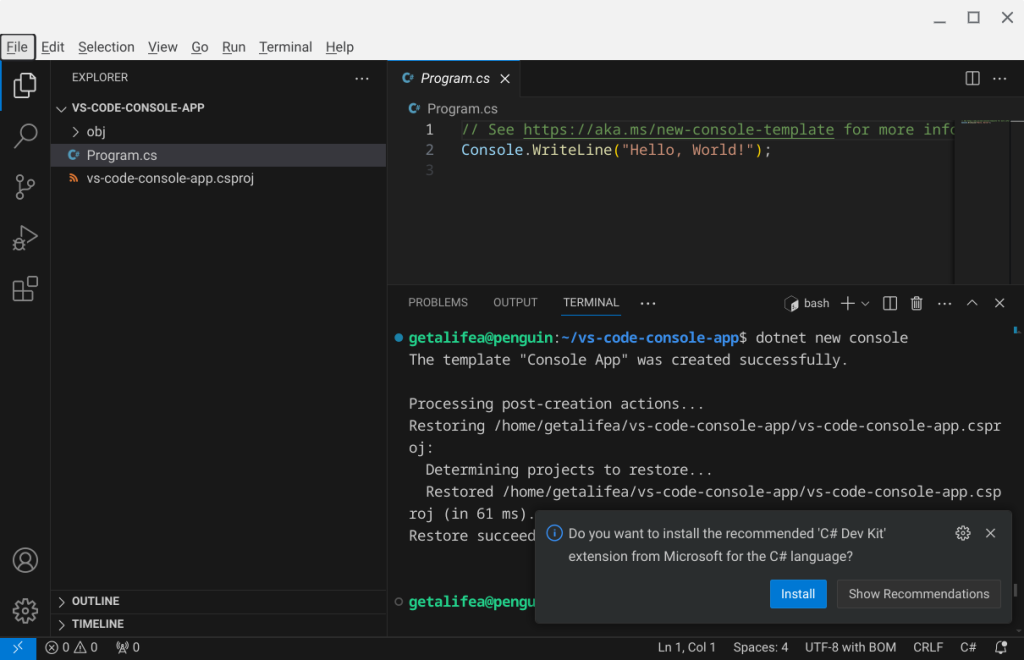
When you click on Program.cs in the left files and folders pane, you will see a popup in the bottom right corner to install the C# Dev Kit. Go ahead and install it to benefit from code hints and other features.
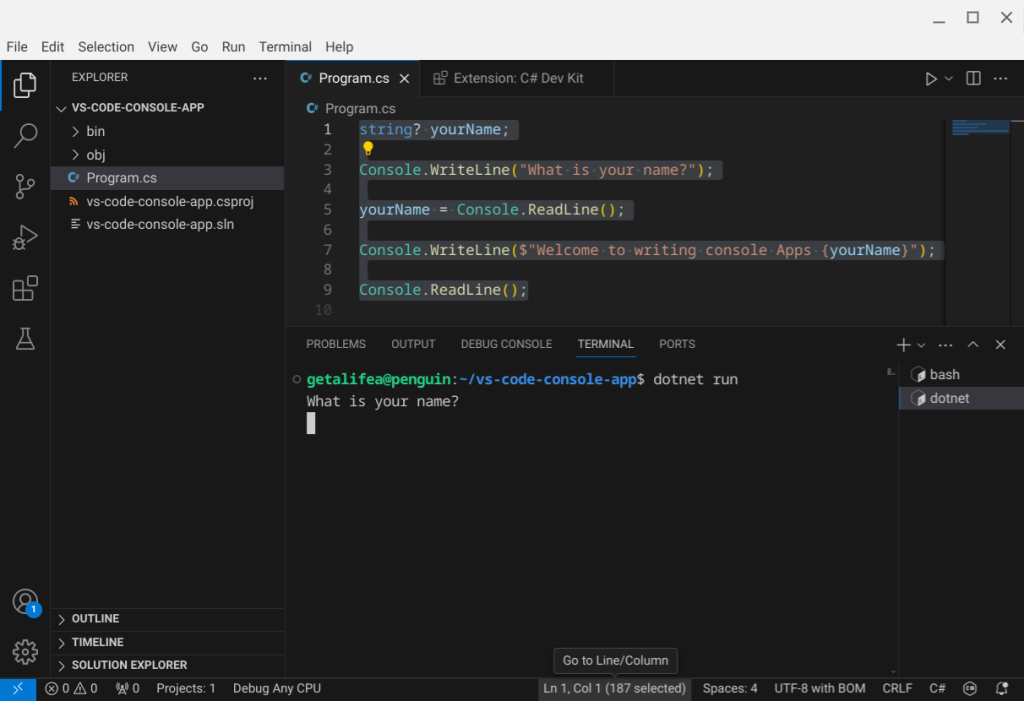
Replace the basic “Hello World” code in Program.cs with the following:
string? yourName;

Console.WriteLine("What is your name?");

yourName = Console.ReadLine();

Console.WriteLine($"Welcome to writing console Apps {yourName}");

Console.ReadLine();
Then, in the terminal, type the following command to build and run your first console app.
dotnet run
Once you familiarize yourself with the syntax by creating a few console apps, you can use the MVC web template to create your first dynamic website or explore the CMS templates available for .NET.
Chromebook’s linux development environment option creates a linux container. A sandbox for development.
Wouldn’t it be neat and convenient to install WordPress in a safe environment to try out latest features of WordPress?
Starting the linux development environment container
Open the terminal app and click

Clicking setup will take you to settings window where you can click “turn on” to have your Chromebook create a linux container.

This opens the setup wizard for you to configure the size and account name for the development environment.

Since your container is just for testing things out in a baseline sandbox leaving the size to 10gb would be fine.
Nice progress bar as your container is being provisioned.
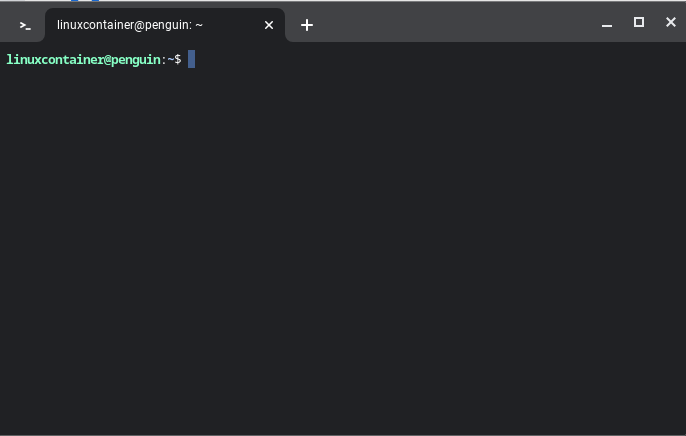
Terminal is created
Now save the following bash script in a .sh text file using a code editor.
You can use the following Text code app (https://chrome.google.com/webstore/detail/text/mmfbcljfglbokpmkimbfghdkjmjhdgbg)
#!/bin/bash
# Update package lists
sudo apt update
# Install Apache2, MariaDB, PHP, and related packages
sudo apt install -y apache2 mariadb-server php libapache2-mod-php php-mysql
# Restart Apache2
sudo systemctl restart apache2
# Secure MariaDB installation
sudo mysql_secure_installation
# Create a database for WordPress
sudo mysql -u root -p -e "CREATE DATABASE wordpressdb;"
sudo mysql -u root -p -e "GRANT ALL PRIVILEGES ON wordpressdb.* TO 'wordpressuser'@'localhost' IDENTIFIED BY 'your_password';"
sudo mysql -u root -p -e "FLUSH PRIVILEGES;"
# Change to web server root directory
cd /var/www/html
# Download and extract WordPress
sudo curl -O https://wordpress.org/latest.tar.gz
sudo tar -xvf latest.tar.gz
sudo mv wordpress/* .
sudo rm -r wordpress
# Create WordPress configuration
sudo cp wp-config-sample.php wp-config.php
sudo sed -i "s/database_name_here/wordpressdb/g" wp-config.php
sudo sed -i "s/username_here/wordpressuser/g" wp-config.php
sudo sed -i "s/password_here/your_password/g" wp-config.php
sudo sed -i "s/localhost/localhost/g" wp-config.php
# This allows downloading of plugins from wordpress.org on local chromebook install
echo "define('FS_METHOD', 'direct');" >> wp-config.php
# Get the current username
username=$(whoami)
# Change ownership of /var/www/html to the current user
sudo chown $username:$username -R /var/www/html
# Set file permissions
sudo chmod -R 755 /var/www/html/
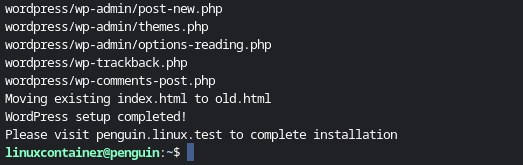
echo "Moving existing index.html to old.html"
mv index.html old.html
echo "WordPress setup completed!"
echo "Please visit penguin.linux.test to complete installation"
Save the bash script
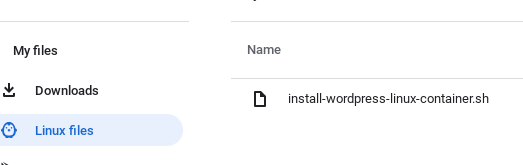
Save the bash script file with extension “.sh” and copy it to “linux files”. I named the file install-wordpress-linux-container.sh
give execution permissions
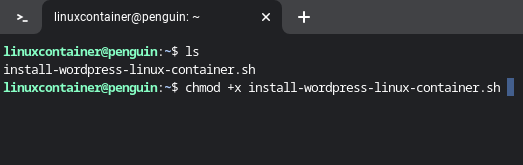
Once file is copied to “linux files” you can see the file in terminal when you type ls and press enter. Give execution permission to the .sh bash file.
Run bash script in chromebook
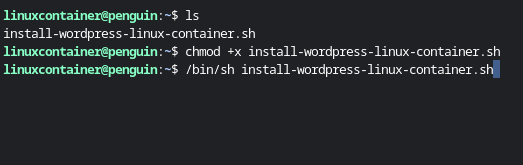
Now you can run the bash script file by typing the following in terminal for your linux container on your Chromebook.
This will install the packages PHP, Apache, and Mariadb, Then WordPress install wizard will be populated with database information.
/bin/sh install-wordpress-linux-container.sh
While the script is installing mariadb there are some prompts.
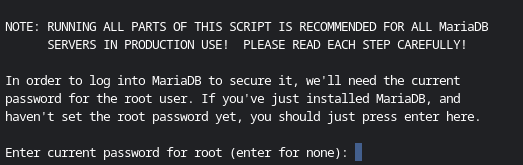
Since this is a local dev environment. Just press enter.
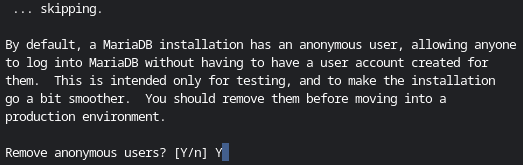
Anonamous User prompt
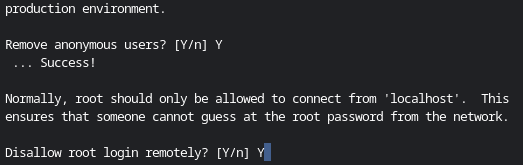
Remote login prompt
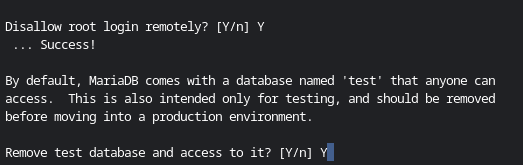
Remove test database
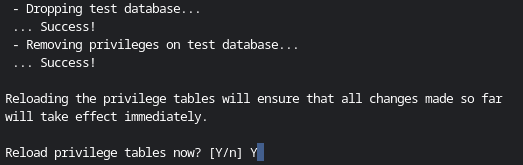
Reload privilege tables
Finally installation complete
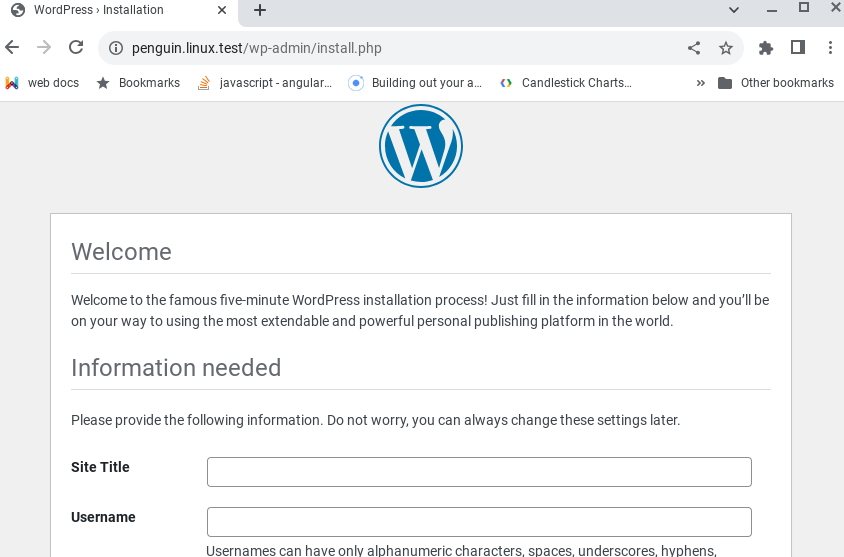
Once bash script finishes you can visit http://penguin.linux.test. Start filling in the form for the localhost installation of WordPress.
Finally installation complete
Happy developing and testing your WordPress work.
Reference
You may have wondered about the difficulty of programming in different programming languages. Most likely you will realize, articulating thoughts in a written format, in a language you grew-up speaking, is more complex than computer programming.
The basic parts of a programming language are conditionals and subjunctions. The most common subjunctions – if, else, else if, switch, and for. There are other complex subjunctions available as pre-defined functions in a programming language. Check the documentation. Of course you also define your own functions.
Similar to a written language, punctuation is required when programming. In programming, punctuation is called syntax. Each language has a syntax. For example, usage of curly braces, brackets, semicolons, hash rockets, arrows, parenthesis’s, commas, and tab spaces.
The conditionals and sub-junctions are supported by logic. The logic is a sequential progression of a narrative. Narratives are multiple stories of a user interacting with your program. The formulated logic is used to write pseudocode prior to researching the means to write actual code for your program.
Prior to programming you can diagram your logic and plan your programming prior to opening a code editor. While planning you also evaluate the environment where the program is going to run or execute.
Main impediment to programming is learning to learn. This impediment is further assisted by the difficulty we have in modern times of being attentive. Since most of us were raised to be consumers and not doers. Also the world has plethora of distractions and many magicians who would spin us around and have us traverse their long winding paths.
One form of learning is where the principles of a subject are summarized. This is similar to how in the past social truths were taught through a oral tradition called nursery rhymes. Once memorized, the details are filled in over time through trial and error or further study. This format of education is still common in far East and Asia Minor. The predominant western style of education focuses more on analytical thinking and less on memorization. Once you understand a particular concept or theory – there is a book, calculator, or a app for that.
Steps to your first program
Your first program regardless of the programming languages begins with a story. The story involves your prospect program and a user or audience. You can diagram this story using circles and quadrilaterals.
Next, while still in the planning stage. Write down the stories using logical statements. The logical statements would serve well later as pseudocode.
The final step is actually writing your program. Most of the issues are related to having the environment prepared prior to programming and complex interdependence of components for the programming language you are trying to use. If you are new to programming then start programming with a command line language such as bash, python on a Linux Operating system and DOS shell on a Windows environment. Command line languages provide instant feedback and are easily accessible and common. If you are a experienced programmer then it’s worth it to dedicate a small computer for each development environment for example a Mini Dell OptiPlex.
Further Thought Provoking References:
“Example of pseudo-code usage” (https://alistapart.com/article/aria-and-progressive-enhancement/)
“Example of pseudo-code in Article”“Logic as a tool” (https://www.google.com/books/edition/Logic_as_a_Tool/R687CwAAQBAJ)
“Logic as a Tool”“Software Engineering: A Methodical Approach” (https://www.google.com/books/edition/Software_Engineering/RWMnCgAAQBAJ)
“Software Engineering: A Methodical Approach”“Nursery Rhymes and Hidden Meanings” (https://en.wikipedia.org/wiki/Nursery_rhyme)
“Nursery Rhymes and Hidden meanings”One of the wonderful things about a programing language is they include predefined functions. When trying to transform a string to a array there is a function for that.
PHP was the original template engine for making websites for the C programing language. PHP is often thought of as a sledge hammer of a programming language because with a minimal effort you can create interactive content on the web. Specially since there is a prebuilt function for almost anything.
Why convert a string to a array in the first place? Suppose you want to store a complex string in temporary storage, be it a file, or a temporary column in a row of a database.
The prebuilt function in php for converting strings to an Array is parse_str and you can try it out on a command line interactive shell on a system with php installed.
On a interactive shell e.g terminal run the following command:
php -a
To try out parse_str function you need to assign a string to a variable first. Let’s make up a variable name:
parse_str takes in two variables inside the parenthesis. First variable is the string and the second variable is the output conversion of the string to a Array.
parse_str($variableOne, $outputVariable);
You know about the input variable and the output variable because parse_str function is documented here
Sometimes you supposedly see open source code with excessive obfuscation to the point where variables are x’s and y’s and you wonder about the motive of the developer. Let’s have a meaningful variable.
$storeStringForArray = "";
Next we need to know the syntax (e.g. format) of the required string for the string to be transformed into a array using parse_str function.
The string should start with a ampersand. This way you can append to a existing string.
$storeStringForArray = "&";
Most basic example of a string storing a key and a value would be:
$storeStringForArray = "&boxType[]=redBoxes";
You may want to try storing a two dimensional array of items. To have the array be accessible using key value pairs.
To allow for the use of following code and output for the key boxType.
echo $outputArray[boxType][0];
To set a key in the array, write a name with empty brackets followed by a ampersand. To set a value for each key, write equal and type the value.
You can try out the function by declaring following keys: stuff, boxType, and boxName.
Let’s type in the string and store in variable named $storeStringForArray
php > $storeStringForArray = "&stuff[]&boxType[]=redBoxes&boxName[]='box one'";
Now you can use the parse_str function and give the function the variable you declared named $storeStringForArray
The function needs to output the array to a variable and here you can name that variable $outputArray.
php > parse_str($storeStringForArray,$outputArray);
Now we can print the array using print_r function and hit enter.
php > print_r($outputArray);
The php interactive shell displays the following output.
Array
(
    [stuff] => Array
        (
            [0] =>
        )

    [boxType] => Array
        (
            [0] => redBoxes
        )

    [boxName] => Array
        (
            [0] => 'box one'
        )

)
Now when you echo the boxType key, the php interactive shell displays the following.
php > echo $outputArray[boxType][0];
redBoxes
Well, there you have it. Objects are to JavaScript as Arrays are to PHP.
This type of clear concise information is usually buried in documentation and requires research with trial and error to uncover.
Web development code doesn’t exist in a vacuum. How you code and final outcome hinges on the circumstances of how your code interacts with other processes and systems. Iteration is the first technical challenge for a web developer when switching to another language. Iteration is the amount of steps and time it takes to view changes made to your application.
There is JavaScript, technically known as ECMAScript that runs entirely on your customers web browser and then there is “Java”. Here is a diagram of where deployed Java is hosted:
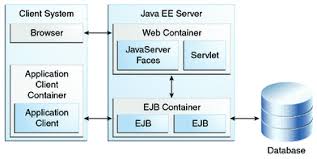
After a web application is deployed for Java, it resides in this stack above. This is after developing for various components of the diagram above. Each component has a plethora of API’s, frameworks, and multiple associated files may link to a single piece of code. Don’t be surprised when the end result is “Fizz Buzz”.
Besides the complexity, the iteration factor in this language is compilation after every code change.
Now let’s look at a well known and familiar diagram of PHP.
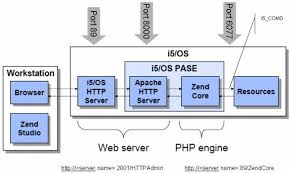
PHP language was designed to be a template engine. To this day you find PHP tags coinciding with HTML markup. The organization of application is completely left for developers to decide. What frameworks to use if any, various types of code, processes that store and retrieve the source code in a repository, and how final results are tested.
The iteration factor in PHP language is simply reloading of your application view or page in a common web browser after making changes. Provided there isn’t web server cache.
There is another language that was designed to be a template engine, VBScript served through ASP – Active Server Pages. The iteration factor is same for ASP as it is for PHP.
The increase in iteration factor is the result of the size of team you are working with, DevOps processes for each deployment and managerial evaluation.
Terms
- “Fizz Buzz” – code::dive 2016 lecture(https://youtu.be/brfqm9qzc)
- “Complexity” – Principle of least power
Images
-
- “java-notes” (oracle.com)
- “php-notes” (zend.com)
- “asp-notes” (msdn.com)
After copy pasting your key file and certificate for your App Engine custom domain. You receive a generic popup error in cloud console.
   Error

Sorry, there’s a problem. If you entered information, check it and try

again. Otherwise, the problem might clear up on its own, so check back later.
The actual error message is listed under activity area from dashboard of Google cloud console and the error states the following:
Invalid argument (HTTP 400): Invalid certificate. `CertificateRawData`

must contain a PEM encoded x.509 public key certificate, with header and

footer included, and an unencrypted PEM encoded RSA private key, with

header and footer included and with size at most 2048 bits. The requested

private key and public certificate must match.
Before you can upload a ssl certificate, the ssl certificate private key has to be a RSA encoded private key and certificate needs to be x509 encoded. Let’s back track and go through the steps to properly request a csr and key file. After generating a csr file you will request a certificate from registrar by copy pasting csr or uploading a file with csr text.
Step 1:
First you need to create a csr and private key file. Openssl command is used to generate a csr and private key file. Openssl command is available in most linux command line operating systems. If you visit openssl project website you will notice there isn’t a windows binary file available. If you are a Windows user, you can run openssl command using Google cloud shell machine from your web browser described here:
$ openssl req -new -newkey rsa:2048 -nodes -subj /C=US/CN=COMMON_NAME -keyout KEYFILE
Replace COMMON_NAME with domain name for which you are generating a request file known as csr.
$ openssl req -new -newkey rsa:2048 -nodes -subj /C=US/CN=YourDomainName.com -keyout mykey.key
Step 2:
Transform generated key file from running openssl req command to an rsa key.
openssl rsa -in mykey.key -out mykey.key.pem
Step 3:
Upload your csr to certificate authority for approval. Domain level csr are normally approved within a few minutes.
For GoDaddy you can upload your csr file or copy paste csr text for standard domain verification. Your csr is verified within a few minutes and you will be able to download a certficate file ending with file name .crt:
https://www.godaddy.com/help/request-an-ssl-certificate-562
Step 4:
Download approved crt file from certificate authority and convert to x509
openssl x509 -in certificate.crt -out certificatex509.crt
Step 5:
Check if your rsa key file and x509 certificate match.
openssl x509 -noout -modulus -in certificatex509.crt | openssl md5


openssl rsa -noout -modulus -in mykey.key.pem | openssl md5
Step 6:
Upload mykey.key.pem and certificatex509 to app engine:
gcloud app ssl-certificates create --certificate=C:\path\to\cert\certificatex509.crt --display-name=my-cert-1 --private-key=C:\path\to\cert\mykey.key.pem
Step 7:
Login to cloud console and assign my-cert-1 to your custom domain.
Resources
“Securing Custom Domains with ssl” (https://cloud.google.com/appengine/docs/standard/php/securing-custom-domains-with-ssl)
Securing Custom Domains with ssl
“Verify the private key and cert” (https://cloud.google.com/appengine/docs/standard/php/securing-custom-domains-with-ssl#converting_private_keys_and_concatenating_ssl_certificates
)
Verify the private key and cert (3.)
“Upload ssl certificate using GCLOUD API Reference” (https://cloud.google.com/sdk/gcloud/reference/app/ssl-certificates/create)
GCLOUD API Reference to upload ssl certificate
Tag Stackoverflow Questions
“Adding new ssl certificate in google app engine” (https://stackoverflow.com/questions/41624437/adding-new-ssl-certificate-in-google-app-engine)
“Trying to get an ssl certificate from comodo to work for google app engine” (https://stackoverflow.com/questions/18861830/trying-to-get-an-ssl-certificate-from-comodo-to-work-for-google-app-engine)
“Trouble with google apps custom domain ssl” (https://stackoverflow.com/questions/17569312/trouble-with-google-apps-custom-domain-ssl)
Maybe you happen to come across a chapter about algorithms in a book titled “Programming Pearls”. In one of the chapters you notice basic pseudocode trying to solve a problem by coding a simple algorithm. The simple algorithm is being used to select a range of numbers between two largest numbers in a list and provide a sum. For the example “Programming Pearls” uses a list of numbers. The pseudocode is in C language syntax and you wonder how complex would it be to write this algorithm in JavaScript that actually worked.
You place sample list of numbers in JavaScript using Array syntax. In JavaScript, Arrays are created using brackets. You assign the array of numbers from “Programming Pearls” book to a variable xvector.
var xvector = [31,-41,59,26,-53,58,97,-93,-23,84];
After declaring the above variable you “let the pot boil for a while” as they say. Most languages have pre-built functions, you wonder, maybe JavaScript also has pre-built functions. Where would those functions be listed? You visit your local bookstore and notice “JavaScript the definitive guide”. Hey, there is a list of all or at least the most used pre-built functions in the language. You find there is a Math function with the option of max to find max values when providing an argument that is a string.
After a few console.log errors, you test out proper string argument required by Math.max function. You discover it’s best to use apply method shown in “The definitive guide”.
Math.max.apply(null, your-argument);
You start writing down the variables and constants you need for this algorithm to avoid later confusion when debugging your code.
You also realize you have to store the position of each number in the list.
   var positionOne = 0;
   var positionTwo = 0;
Also you figure, amount of numbers provided to algorithm needs to be divided in half, to later find the largest number in each half.
halfOfVector = xvector.length / 2;
Algorithm also needs to temporarily hold the value of two largest numbers.
    var largeOne = 0;
    var largeTwo = 0;
Everytime the algorithm script runs the algorithm script needs to reset the value of halfOfVector.
var halfOfVector = 0;
Let’s also reset the totalMax value to zero.
var totalMax = 0;
We will traverse through half of the numbers in vector using i and other half using j.
     var i = [];
     var j = [];
After writing first “for loop” to traverse through first half of numbers. How do you make JavaScript interpreter traverse a list of numbers in reverse? You leave this pot on low heat and step away to ponder. Maybe spinning a fidget spinner, throwing magnetic darts on a board, or doing your daily chores.
You decide to store the amount of numbers in list as reverseCount and minus reverseCount with each traversal in for loop.
var reverseCount = xvector.length - 1;
While you are writing your “for loops” you are also writing out console.log to see if the end result is what you want to return.
You wrap the entire script in a function that accepts a list of numbers.
findLargestNum(xvector) { .. };
You also include a set of console.log to verify your work.
console.log("totalMax from position "+positionOne+" "+xvector[positionOne]+" to  "+xvector[positionTwo]+" "+ positionTwo +" seems to be "+totalMax+"");
console.log("large x :"+largeOne+"");
console.log("large y :"+largeTwo+"");
console.log("complete vertex "+ xvector +"");
Complete HTML document with Simple Algorithm Code
    <script>

          var xvector = [31,-41,59,26,-53,58,97,-93,-23,84];

          //reverse order
          function findLargestNum(xvector){
              var xvector = xvector;
              var reverseCount = xvector.length - 1;
              var halfOfVector = 0;
              var positionOne = 0;
              var positionTwo = 0;
              var totalMax = 0;
              var someargs = [];
              var largeOne = 0;
              var largeTwo = 0;
              var i = [];
              var j = [];

              halfOfVector = xvector.length / 2;

              //Thought: iteration will need to be Math.pow(n,2);

              //console.log("half of :"+halfOfVector+"");

              //store the position of largest numbers in list array

              for(let x = 0;  x <= halfOfVector - 1; x++){

                 i[x] = xvector[x];

                 //console.log("only five "+i+"");
                 //console.log("complete vertex "+ xvector +"");

              }

              for(let y = 0; y <= halfOfVector - 1; y++){

                 j[y] = xvector[reverseCount];

                 //console.log("only last five "+j[y]+"");
                 //console.log("complete vertex "+ xvector +"");

                 //console.log(reverseCount);

                 reverseCount--;

              }

              largeOne = Math.max.apply(null, i);
              largeTwo = Math.max.apply(null, j);

              for(let pos = 0; pos <= xvector.length - 1; pos++ ){

                   //console.log("position "+pos+" number "+xvector[pos]+" large "+largeOne+" largetwo "+largeTwo+"");

                   if(xvector[pos] == largeOne){
                            positionOne = pos;
                   }

                   if(xvector[pos] == largeTwo){
                            positionTwo = pos;
                   }

              }

              for(let pos = positionOne; pos <= positionTwo; pos++ ){

                    console.log("adding number "+xvector[pos]+" to totalMax var");
                    totalMax += xvector[pos];

              }

              return totalMax;

              console.log("totalMax from position "+positionOne+" "+xvector[positionOne]+" to "+xvector[positionTwo]+" "+ positionTwo +" seems to be "+totalMax+"");
              console.log("large x :"+largeOne+"");
              console.log("large y :"+largeTwo+"");
              console.log("complete vertex "+ xvector +"");

          }

    </script>

Resources
“Programming Pearls” (http://www.informit.com/store/programming-pearls-9780201657883)
“JavaScript: The Definitive Guide” (http://shop.oreilly.com/product/9780596805531.do)
Here is a module to create vertical html bar graph from three column csv files.
Video of how it functions
Live Example
Module code for copy and pasting
/*

*Author: Zeshan B.

*Date: June 23, 2017

*Dependency: d3.v4.js

*Module name: Three Column Bar Chart

*/

var threeColBarChartModule=function(d3){function loadBarChartData(csvFileURI,chartContainer,chartWidth,chartHeight){var chartDataLoaded={loadStatus:"data not loaded"};switch(Boolean(void 0!==chartContainer)){case!1:console.log("chartContainer id selector not defined")}switch(Boolean(void 0!==chartHeight)){case!1:console.log("chartHeight in px not defined")}d3.csv(csvFileURI,function(error,data,chartDataLoaded){for(chartData=data.map(function(x){return{columnA:x.columnA,columnB:x.columnB,columnC:x.columnC}});chartData;)return chartData}),setTimeout(function(){createBarChart(chartDataLoaded=chartData,chartContainer,chartWidth,chartHeight)},400)}function createBarChart(chartDataLoaded,chartContainer,chartWidth,chartHeight){function columnConfig(colColor,colVal,chartDataLoaded,addMargin){var rightMargin="5px";switch(addMargin){case!0:rightMargin="20px";break;default:addMargin=!1}d3.selectAll("div").select(chartContainer+" .chart").selectAll(".colname").select("span").append("div").data(chartDataLoaded).attr("class",function(a){return colVal+" barOne"}).style("width","40px").style("height",colVal+"px").style("display","block").style("background-color",""+colColor).style("float","left").style("margin-left","0px").style("margin-right",""+rightMargin).style("margin-top",function(){if(colVal>=chartSizeHeight){var setMarginTop=0;return setMarginTop+"px"}if(colVal<chartSizeHeight)return(setMarginTop=chartSizeHeight-colVal)+"px"}).style("height",function(){return colVal>chartSizeHeight?100+"%":colVal===chartSizeHeight?100+"px":colVal+"px"}),d3.selectAll("div").select(chartContainer+" .chart").selectAll(".colval").select("span").append("span").data(chartDataLoaded).text(function(a){return""+colVal}).style("display","block").style("float","left").style("width","40px").style("height","30px").style("text-align","center").style("color","#dcd7d7").style("text-shadow","1px 1px 1px black").style("position","relative").style("margin-right",""+rightMargin)}var chartContainer=chartContainer,numOfDivsInChart=20,chartWidth=chartWidth,chartHolder=d3.select(""+chartContainer);chartHolder.style("display","block").style("display","block").style("margin-left","auto").style("margin-right","auto").style("width",""+chartWidth).style("height","auto").style("overflow-x","auto").style("border-style","solid").style("border-color","gray").style("border-width","2px"),chartHolder.append("div").attr("class","chart").style("display","block").style("width","").style("height",""+chartHeight),chartHolder.select(chartContainer+" .chart").append("div"),d3.select(""+chartContainer).select(".chart").insert("div").attr("class","colval"),d3.select(""+chartContainer).select(".chart").insert("div").attr("class","colname");d3.select(""+chartContainer).select(".chart").select(".colval").insert("span"),d3.select(""+chartContainer).select(".chart").select(".colname").insert("span"),d3.select(".chart");for(var chartHeight,chartSizeHeight=+chartHeight.substr(0,3),iterItem=(d3.selection(".chart").style("width").valueOf().substr(0,2),0);iterItem<=chartDataLoaded.length-1;iterItem++){var currentItem=chartDataLoaded[iterItem];columnConfig("rgb(232, 98, 63)",currentItem.columnA,chartDataLoaded),columnConfig("rgb(63, 232, 79)",currentItem.columnB,chartDataLoaded),columnConfig("steelblue",currentItem.columnC,chartDataLoaded,!0),numOfDivsInChart++}d3.select(chartContainer+" .colval").style("display","block").style("position","relative").style("width","100%").style("height","40px").style("top","102%").style("left","0px").style("z-index","1"),d3.select(chartContainer+" .chart").style("width",33*numOfDivsInChart+"px")}return{createChart:function(csvFileURI,chartContainer,chartWidth,chartHeight){loadBarChartData(csvFileURI,chartContainer,chartWidth,chartHeight)}}}(d3);
Resources
“Web VTT Closed Captions” (https://github.com/
silviapfeiffer/silviapfeiffer.github.io)
“subtitles” (https://flowplayer.com/docs/subtitles.html)
“d3js” (http://d3js.org)
With d3js and a JavaScript Module you can easily create a bar chart or graph using a csv — Comma Separated file.
Browsing through d3js documentation maybe you wished there was a pre-packaged module that generated a simple bar chart. The following barChartModule can easily allow one to simply create and display a HTML bar chart.
Creating a csv file
First you need a simple comma separated file with data to use with barChartModule. Here is a sample csv file opened in notepad:
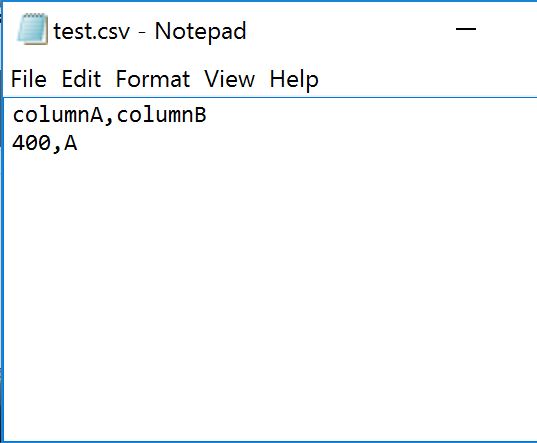
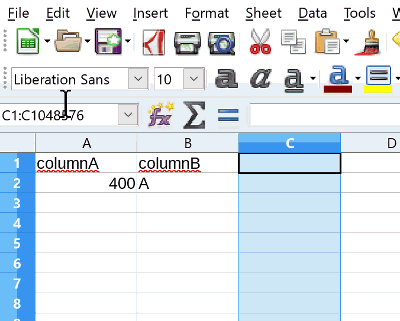
Here is a comma separated csv file in notepad. Notice columnA and columnB in first line.
CSV file requires column names in A1 and B1 as “columnA” and “columnB”.
To avoid complexity you can create a csv file using LibreOffice Calc libreoffice.org or MS Office Excel software. Be sure csv file has A1 and B1 columns as columnA and columnB.
LibreOffice
Open Libre Office or spreadsheet software in your favorite office suite.
HTML page with bar chart
BarChartModule requires d3.v4.js from d3js.org included between head tags of your HTML document. Right below d3.v4.js inclusion, please include barChartModule.js.
Here is a complete html document. Requires d3.v4.js and barChartModule.min.js script includes.
<!DOCTYPE html>

<html>

    <head>

        <title></title>

        <meta charset="utf-8">

        <script src="js/d3.v4.js"></script>

        <script src="js/barChartModule.min.js"></script>

    </head>

<body>


     <div id="MyChartOne">


     </div>


<script>


    barChartModule.createChart("data/test.csv", "#MyChartOne", "400px");


</script>

</body>

</html>
You only need a div tag with id selector of your choice. In this example id is set to “MyChartOne”.
     <div id="MyChartOne">


     </div>
Before the closing body tag, you can run createChart function from barChartModule, inside script tags.
Properties of createChart function allow for setting csv file location, id tag of div to place chart, and height of displayed div frame around bar chart.
barChartModule.createChart("location-of-csv-file-relative-to-html-document", "#div-id", "height in px");
Other look and feel may be styled using standard ways of styling HTML documents.
Running graph on local computer
Due to loading data from a csv file asynchronously, a simple http server is required. To use this module also requires a simple http server such as Apache. You can also try this on a free web hosting account from your domain registrar.
Here is how chart looks
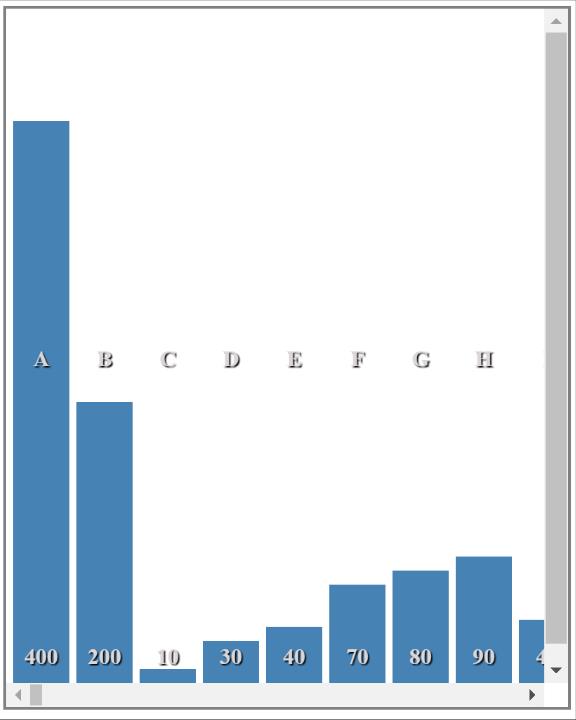
Bar Chart generated with module
Here is how bar chart will look with more rows in csv file.
Since this is a module, one can display multiple charts and graphs.
    <div id="MyChartOne" style="float:left;height:200px">


     </div>


     <div id="MyChartTwo" style="float:left;margin-left: 70px;height;200px">


     </div>


<script>

    var chartOne = barChartModule.createChart("data/test.csv", "#MyChartOne", "400px");

    var chartTwo = barChartModule.createChart("data/test.csv", "#MyChartTwo", "400px");

    chartOne;

    chartTwo;

</script>
Generating a bar chart from csv file with over 900 rows

Bar Chart generated with module
Here is how bar chart will look with many more rows in csv file.
Here is barChartModule.js
You can copy barChartModule below and save as barChartModule.min.js. Use with your comma separated data in your web hosted html documents.
//Author: Zeshan B.

//Date: May, 17, 2017

//Dependency: d3 Version 4

//Version: 1.0v

var barChartModule=function(t){function e(e,s,a){var c={loadStatus:"data not loaded"};switch(Boolean(void 0!==s)){case!1:console.log("chartContainer id selector not defined")}switch(Boolean(void 0!==a)){case!1:console.log("chartHeight in px not defined")}t.csv(e,function(t,e,l){for(chartData=e.map(function(t){return{columnA:t.columnB,columnB:t.columnA}});chartData;)return chartData}),setTimeout(function(){c=chartData,l(c,s,a)},400)}function l(e,l,s){var a=t.select(""+l).append("div").attr("class","chart").style("display","block").style("height",""+s).style("width","200px").style("z-index","1");a.select(".chart").append("div"),t.select(""+l).select(".chart").insert("div").attr("class","colval"),t.select(""+l).select(".chart").insert("div").attr("class","colname");var s,c=t.select(""+l).select(".chart").select(".colval").insert("span"),o=t.select(""+l).select(".chart").select(".colname").insert("span"),n=(t.select(".chart"),+s.substr(0,3)),r=(t.selection(".chart").style("width").valueOf().substr(0,2),+t.selection(".chart").selectAll("div")._groups[0].length);a.selectAll("div").select(".chart").data(e).each().enter().append("div").attr("class",function(t){return t.columnA.replace(/\s/,"-")+" bar"}).style("width","40px").style("background-color","steelblue").style("margin-top",function(t){var e;return t.columnB>=n?e=0:t.columnB<n&&(e=n-t.columnB),e+"px"}).style("height",function(t){return t.columnB>=n?100+"%":t.columnB+"px"}),a.select(".colval").style("display","block").style("float","left").style("position","relative").style("width","100%").style("height","40px").style("bottom","-113%").style("left","0").style("z-index","1"),a.select(".colname").style("display","block").style("position","relative").style("width","100%").style("height","40px").style("top","50%").style("left","0").style("z-index","1"),c.selectAll("span").data(e).enter().append("span").attr("class","colval").text(function(t){return""+t.columnB}).style("display","block").style("width","40px").style("height","30px").style("color","#dcd7d7").style("text-shadow","1px 1px 1px black").style("position","relative").style("margin-left","5px").style("float","left"),o.selectAll("span").data(e).enter().append("span").attr("class","colname").text(function(t){return""+t.columnA}).style("position","relative").style("display","block").style("color","#dcd7d7").style("text-shadow","1px 1px 1px black").style("width","40px").style("height","30px").style("margin-left","5px").style("float","left"),a.selectAll("div").style("float","left").style("text-align","center").style("color","#fff").style("font-weight","bold"),a.selectAll(".bar").style("margin-left","5px"),t.select(l).style("display","block").style("margin-left","auto").style("margin-right","auto").style("height","inherit").style("width",""+s).style("overflow-x","auto").style("overflow-y","auto").style("border-style","solid").style("border-color","gray").style("border-width","2px"),r=+t.selection(".chart").selectAll("div")._groups[0].length,a.style("width",55*r+"px")}return{createChart:function(t,l,s){e(t,l,s)}}}(d3);
References
“d3js selection” (https://github.com/d3/d3/blob/master/API.md#selections-d3-selection)
“d3js csv” (https://github.com/d3/d3-request/blob/master/README.md#csv)
“Learning JavaScript Design Patterns”(http://shop.oreilly.com/product/0636920025832.do)